Introduction
This guide is not meant to list every CS2 console command available in the game. Large Counter-Strike 2 console commands lists already exist - and in practice, they are rarely useful. Instead, this guide focuses on the best CS2 console commands that players actually use for practice, training, real gameplay, and FPS optimization.
As of 2026, Counter-Strike 2 contains roughly 2750 console variables and CS2 console commands. About 2150 of them are visible through cvarlist; the rest are internal, developer-only, or server-restricted. In reality, most players interact with fewer than 40–50 commands on a regular basis - everything else is noise.
Every command in this guide is CS2-specific, verified against current builds, and chosen based on how the game actually behaves today. No legacy CS:GO leftovers and no deprecated launch options. It also highlights the most useful CS2 practice commands, gameplay commands, and ready-to-use config setups for everyday use.

For reference, Valve maintains an official list of CS2 console commands and variables here:
How CS2 Console Commands Work
Counter-Strike 2 uses a different console and configuration system than CS:GO (Source). Built on Source 2, CS2 no longer relies on many legacy commands - a large number were removed, renamed, or internally restructured.
At startup, the game initializes a base layer of console variables from internal configuration files. By default, CS2 loads roughly 420 commands and variables, primarily from cs2_machine_convars.vcfg (about 330+ machine-level entries) and cs2_user_convars_0_slot0.vcfg (around 90+ user-level entries tied to the active player slot).
For a detailed explanation of where these files are stored, how CS2 loads them, and how they relate to autoexec.cfg and custom configs, see: CS2 Config Location Guide 2026: Where Are Config Files Stored?
Another key difference in CS2 is execution context. Some commands work only on a local server or in offline practice, while others are ignored in Competitive or Premier. This behavior is context-based, not restrictive - the same command can exist, appear in cvarlist, and still have no effect depending on where the game is running.
How to Enable the Console
In CS2, all console commands are entered directly in the developer console while you are in the game. This is where you type commands, test settings, and check available variables. However, the developer console is disabled by default and must be enabled before you can use any console commands.
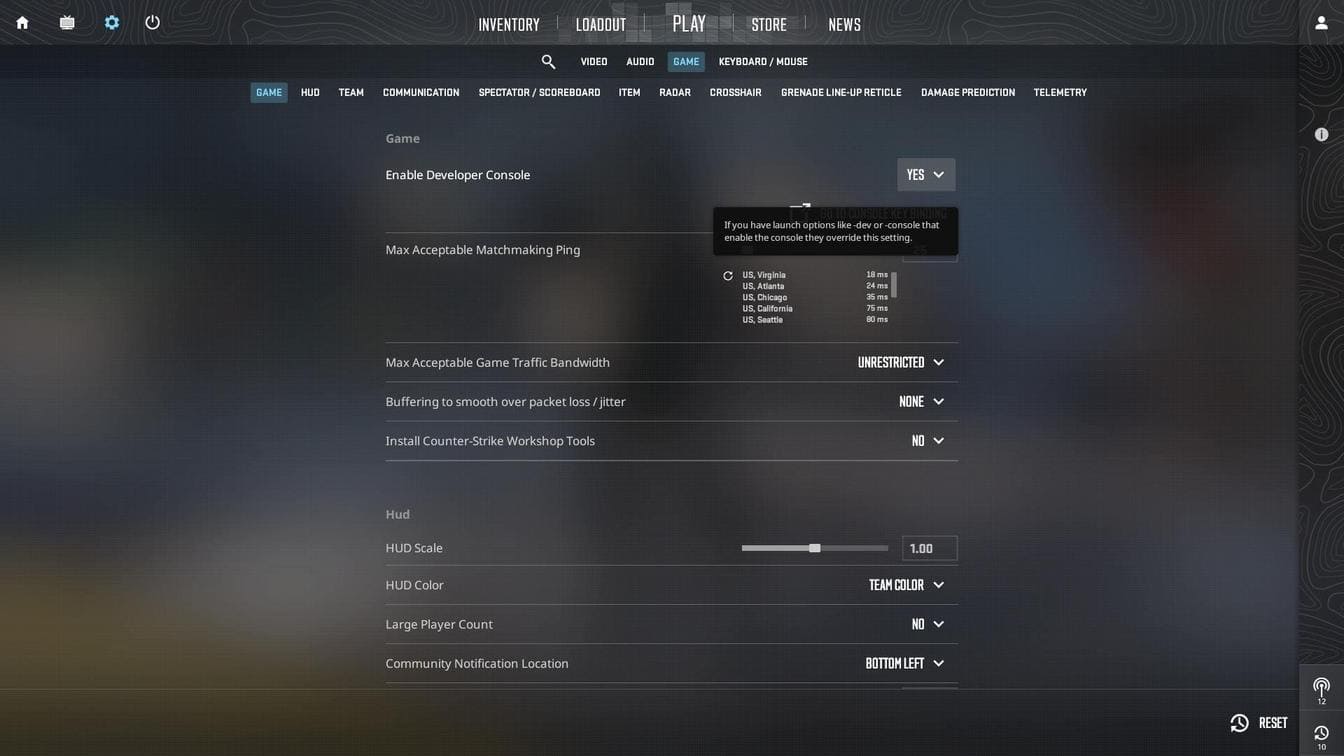
To enable it, open Settings -> Game -> Enable Developer Console, set it to Yes, and then open the console in-game using the ~ (tilde) key. Once enabled, you can enter commands manually, use cvarlist to inspect available variables, or apply settings through config files.
Best CS2 Console Commands for Practice & Training
This section covers console commands used specifically for offline practice and local training. These commands help create controlled scenarios, remove downtime, and repeat the same situations efficiently. They are designed for learning and testing mechanics such as grenade lineups, recoil control, positioning, and movement - not for normal matchmaking or competitive play.
sv_cheats Commands Explained
Commands that require sv_cheats 1 are used to override standard game rules. They provide direct control over mechanics that are normally locked: movement behavior, weapon handling, physics interactions, and visual debugging tools.
These commands exist primarily for developers, map creators, and testing environments, but they are also extremely useful for players who want to understand how CS2 behaves under specific conditions. Used correctly, sv_cheats commands are a powerful learning and experimentation tool - and sometimes simply useful for controlled testing or content creation.
Practice Server Basics
Practice in CS2 usually starts on a local server. Console commands here are used to remove downtime and friction: restarting rounds instantly, extending round time, disabling freeze time, or resetting the match state without reloading the map. These basics allow you to repeat the same situation over and over, which is essential for efficient training.
In the commands below, N represents a numeric value (integer or float). While many commands have no strict upper limit, extremely large values are not recommended. Use realistic values instead (e.g. 3600 for 1 hour, 7200 for 2 hours, not like 999999).
| Command | Values | Description |
|---|---|---|
sv_showbullethits |
0 / 1 | Displays server-side bullet hit information. Default 0. |
sv_showimpacts |
0 / 1 / 2 / 3 |
Displays bullet impact markers for penetration and hit testing (walls, doors, etc.).
0 - disabled (default), 1 - client + server, 2 - client only, 3 - server only. |
sv_showimpacts_time |
0.0 - 10.0 | Duration (in seconds) bullet impact markers remain visible. Default 4.0. |
sv_specnoclip |
0 / 1 | Allows spectators to fly through walls and objects on the map. Default 1. |
sv_enablebunnyhopping |
0 / 1 | Allows speed gain from bunnyhopping beyond normal movement limits. Default 0. |
sv_autobunnyhopping |
0 / 1 | Players automatically re-jump while holding the jump button. Default 0. |
sv_staminajumpcost |
0.0 - 1 | Amount of stamina consumed when jumping. Default 0.080. |
sv_staminalandcost |
0.0 - 1 | Amount of stamina consumed when landing. Default 0.050. |
sv_airaccelerate |
0.0 - N | Controls how quickly players can accelerate while in the air. Default 5.5. |
sv_maxspeed |
0.0 - N | The maximum movement speed limit on the server. Default 320.0. |
mp_warmup_start |
Starts the warm-up. | |
mp_warmup_end |
Ends the warm-up. | |
mp_warmup_pausetimer |
0 / 1 | Pauses (1) or resumes (0) the warm-up timer. Default 0. |
mp_warmuptime |
5 - N | Sets the warm-up duration in seconds. Default 30. |
mp_freezetime |
0 - 60 | Time in seconds players are frozen at round start. Default 6. |
mp_restartgame |
0 - N | Restarts the server. If non-zero, the game restarts after the specified number of seconds. Default 0. |
mp_limitteams |
0 - 30 | Maximum number of players one team can have over the other. Set to 0 to disable. Default 2. |
mp_autoteambalance |
0 / 1 | Automatically balances teams to keep player count within ±1. Set to 0 to disable. Default 1. |
mp_buytime |
0.0 - 90.0 | Time in seconds players are allowed to buy after round start. Default 20.0. |
mp_buy_anywhere |
0 / 1 | Allows buying weapons outside buy zones. Default 0. |
mp_maxmoney |
0 - N | Maximum amount of money allowed. Default 16000. |
mp_startmoney |
0 - N | Starting money for players at match start. Default 800. |
mp_roundtime |
0.10 - 60.0 | Length of a round in minutes. Default 5.0. |
mp_roundtime_defuse |
0.0 - 60.0 | Round time in minutes for defuse maps. Uses mp_roundtime if set to 0. Default 1.920. |
mp_roundtime_hostage |
0.0 - 60.0 | Round time in minutes for hostage maps. Uses mp_roundtime if set to 0. Default 1.920. |
mp_maxrounds |
0 - N | Maximum number of rounds before match ends. 0 = unlimited. Default 24.. |
mp_timelimit |
0 - N | Maximum map duration in minutes. 0 = unlimited. Default 0. |
mp_c4timer |
10 - N | Time in seconds before the planted C4 explodes. Default 40. |
mp_respawn_on_death_ct |
0 / 1 | Instantly respawns CT players after death. Default 0. |
mp_respawn_on_death_t |
0 / 1 | Instantly respawns T players after death. Default 0. |
mp_friendlyfire |
0 / 1 | Allows team damage. Default 0. |
kill |
Kills your character to force a respawn. | |
god |
God mode: no damage and no death. Requires sv_cheats 1. |
|
buddha |
Buddha mode: takes damage but cannot die. Requires sv_cheats 1. |
|
sv_cheats |
0 / 1 | Enables cheat-protected commands. Default 0. |
noclip |
Allows flying through the map. Requires sv_cheats 1. |
|
cl_showpos |
0 / 1 |
Displays real-time position, angles, and speed in the top-left corner.
Default 0. Requires sv_cheats 1.
|
sv_infinite_ammo |
0 / 1 | Enables infinite ammo. Default 0. Requires sv_cheats 1. |
sv_regeneration_force_on |
0 / 1 | Continuously regenerates lost health. Default 0. Requires sv_cheats 1. |
cl_ent_bbox |
* |
Draws debug bounding boxes for entities, allowing you to see players through walls. Requires sv_cheats 1. |
cl_ent_clear_debug_overlays |
Removes all debug overlays created by cl_ent_bbox. Requires sv_cheats 1. |
|
cl_player_proximity_debug |
0 / 1 | Displays debug numbers at player feet, visible through walls. Default 0. Requires sv_cheats 1. |
Grenade Practice
Grenade practice commands are used to study trajectories, timing, and consistency. They allow you to see how grenades fly, bounce, and land without the pressure of a live match. This makes it possible to learn smokes, flashes, and molotovs precisely, test different throws, and reset attempts instantly until a lineup becomes reliable.
| Command | Values | Description |
|---|---|---|
sv_rethrow_last_grenade |
Rethrows the last grenade that was thrown. Requires sv_cheats 1. |
|
sv_grenade_trajectory_prac_pipreview |
0 / 1 | Shows a picture-in-picture preview of the grenade trajectory in practice mode. Default 0. |
sv_grenade_trajectory_prac_trailtime |
0.0 – 8 | Duration (in seconds) the grenade trajectory remains visible in practice mode. Default 0. |
sv_grenade_trajectory_time_spectator |
0.0 – 8 | Duration (in seconds) the grenade trajectory remains visible for spectators. Default 4.0. |
Bot Control
Bot-related commands allow you to create repeatable combat scenarios. You can add or remove bots instantly, control their movement, freeze them in place, or use them as static targets. This makes bots useful not just for warm-up, but for practicing crosshair placement, angle clearing, and timing without randomness.
| Command | Values | Description |
|---|---|---|
bot_add |
Adds a bot to one of the teams. | |
bot_add_ct |
Adds a bot to the CT team. | |
bot_add_t |
Adds a bot to the T team. | |
bot_add easy |
easy | Adds an easy bot to one of the teams. |
bot_add_ct expert |
expert | Adds an expert bot to the CT team. |
bot_add_t muhlik |
name | Adds a bot named Muhlik to the T team. Bot parameters: skill 100, aggression 95, reaction time 0.05 seconds. |
bot_difficulty |
0 / 1 / 2 / 3 | Sets bot difficulty level: easy, normal, hard, expert. Default 1. |
bot_autodifficulty_threshold_low |
-N | If the player score drops below this threshold, bots become easier. Default -2.0. |
bot_autodifficulty_threshold_high |
N | If the player score difference against bots exceeds this value, bots become harder. Default 0.0. |
bot_kick |
all / t / ct / difficulty* / name* | Kicks bots from the server. If no value is specified, all bots are removed. |
bot_knives_only |
0 / 1 | Bots will only use knives. Default 0. |
bot_pistols_only |
0 / 1 | Bots will only use pistols. Default 0. |
bot_snipers_only |
0 / 1 | Bots will only use sniper rifles. Default 0. |
bot_quota |
0 – 20 | Sets the total number of bots on the server. Default 10. |
bot_quota_mode |
normal / fill / match | Controls how the bot quota is maintained. Default fill. |
bot_dont_shoot |
0 / 1 | Bots can move but will not shoot. Default 0. Requires sv_cheats. |
bot_stop |
0 / 1 | Bots freeze in place while AI logic remains active. Default 0. Requires sv_cheats. |
bot_zombie |
0 / 1 | Bots are completely frozen with AI disabled and no reactions. Default 0. Requires sv_cheats. |
bot_crouch |
0 / 1 | Forces all bots to crouch. Default 0. Requires sv_cheats. |
bot_place |
Spawns a bot at the current crosshair position. Requires sv_cheats. |
|
bot_mimic |
0 / 1 | Bots mimic player movement. Default 0. Requires sv_cheats. |
bot_ignore_players |
0 / 1 | Bots completely ignore players. Default 0. Requires sv_cheats. |
Best CS2 Console Commands for Real Gameplay Settings
This section focuses on console commands that are commonly used during real matches. These commands do not change game rules or mechanics - they adjust how information is presented to you. The focus here is clarity: seeing important details faster, reducing visual noise, and making the game easier to read in live situations.
Crosshair & Viewmodel Tweaks
Crosshair and viewmodel commands are about consistency and comfort. They allow you to fine-tune how your hands and crosshair appear on screen so that aiming feels natural and predictable. Small adjustments here can improve precision simply by reducing distraction and keeping your focus where it belongs - on targets and angles.

Detailed guide: CS2 Crosshair Guide 2026: Best Settings, Codes & Commands
Crosshair commands
| Command | Values | Description |
|---|---|---|
crosshair |
0 / 1 | Enables or disables the crosshair (default 1) |
cl_crosshairstyle |
2 / 4 / 5 | Crosshair style: Classic-2, Classic Static-4, Legacy-5 (default 2) |
cl_crosshair_friendly_warning |
1 / 0 | Shows a warning indicator when aiming at teammates (default 1) |
cl_crosshair_recoil |
0 / 1 | Makes the crosshair follow weapon recoil (default 1) |
cl_crosshairdot |
0 / 1 | Enables a center dot in the crosshair (default 0) |
cl_crosshairsize |
0.1 - 10 | Length of the crosshair lines (default 3.90) |
cl_crosshairthickness |
0.1 - 6 | Thickness of the crosshair lines (default 0.60) |
cl_crosshairgap |
-5 - 5 | Gap between crosshair lines and center (default 1) |
cl_crosshair_drawoutline |
1 / 0 | Draws an outline around the crosshair (default 1) |
cl_crosshair_outlinethickness |
0.1 - 3 | Thickness of the crosshair outline (default 1.0) |
cl_crosshaircolor |
0 / 1 / 2 / 3 / 4 / 5 | Crosshair color preset: red-0, green-1, yellow-2, dark blue-3, light blue-4, custom RGB-5 (default 5) |
cl_crosshaircolor_r / g / b |
0 – 255 | Custom RGB crosshair color values |
cl_crosshairusealpha |
0 / 1 | Enables crosshair transparency (default 1) |
cl_crosshairalpha |
0 - 255 | Crosshair transparency level (default 200) |
cl_crosshair_t |
0 / 1 | T-shaped sight (default 0) |
cl_crosshairgap_useweaponvalue |
1 / 0 | Adjusts crosshair gap dynamically based on weapon (default 1) |
cl_ironsight_usecrosshaircolor |
1 / 0 | Uses crosshair color for AUG / SG553 scope dot (default 0) |
cl_ironsight_dot_scale |
0.10 - 2.00 | Size of the AUG / SG553 scope dot (default 1.0) |
cl_show_observer_crosshair |
0 / 1 / 2 | Shows other players' crosshairs while spectating: off / friends / all (default 2) |
cl_observed_bot_crosshair |
0 / 1 / 2 | Shows your crosshair when spectating bots: always / when controlling / never (default 2) |
cl_sniper_delay_unscope |
0 / 1 | Adds a delay before unscoping after firing a sniper rifle (default 0) |
cl_sniper_show_inaccuracy |
0 / 1 | Displays a dynamic inaccuracy indicator inside the sniper scope (default 1) |
cl_sniper_auto_rezoom |
0 / 1 | Automatically re-zooms after firing a sniper rifle (default 1) |
cl_crosshair_sniper_width |
1 – 6 or N | Thickness of the sniper scope crosshair lines (default 1) |
Viewmodel commands
| Command | Values | Description |
|---|---|---|
viewmodel_offset_x |
-2.0 - 2.5 | Moves the weapon model left / right on the screen (default 1.0) |
viewmodel_offset_y |
-2.0 - 2.0 | Moves the weapon model forward / backward (default 1.0) |
viewmodel_offset_z |
-2.0 - 2.0 | Moves the weapon model up / down (default -1.0) |
viewmodel_presetpos |
1 / 2 | Selects predefined viewmodel positions: 1 = Desktop, 2 = Classic |
viewmodel_fov |
54.0 - 68.0 | Sets viewing angle (default 60) |
switchhands |
Switch weapon to left / right hand | |
switchhandsright |
Switch weapon to right hand | |
switchhandsleft |
Switch weapon to left hand |
HUD & Radar Commands
HUD and interface commands control how much information you see and how it is displayed. Radar size, scaling, and UI elements can all be adjusted to make key information more readable at a glance. The goal is not customization for its own sake, but faster decision-making during rounds.


Detailed guide: CS2 HUD Customization, Commands, and Clean HUD Setup
HUD commands
| Command | Values | Description |
|---|---|---|
hud_scaling |
0.90 - 1.10 | Sets the overall HUD scale (default 1.0) |
cl_hud_color |
0 - 12 | Sets the preset color of HUD elements (health, ammo, armor) (default 0) |
ui_steam_overlay_notification_position |
bottomleft / topleft / bottomright / topright | Sets the position of Steam overlay notifications (default bottomleft) |
cl_weapon_selection_rarity_color |
0 / 1 | Highlights the selected weapon in the inventory (default 0) |
cl_force_spec_hud_color_to_team |
0 / 1 | Forces HUD colors to match the observed player's team while spectating (default 0) |
cl_teamid_overhead_mode |
0 / 1 / 2 / 3 | Shows teammate overhead indicators: 0 - Off, 1 - pips, 2 - pips + HP + names, 3 - pips + HP + names + equipment (default 3) |
hud_showtargetid |
0 / 1 | Displays target identification info when aiming at players (default 1) |
Radar commands
| Command | Values | Description |
|---|---|---|
cl_radar_always_centered |
0 / 1 | Keeps the player centered on the radar (default 1) |
cl_radar_rotate |
0 / 1 | Rotates the radar with the player’s view or keeps it fixed to the map (default 1) |
cl_hud_radar_map_additive |
1 / 0 | Enables additive blending for the radar background (default 1) |
cl_hud_radar_background_alpha |
0.000001 - 1 | Sets radar background opacity (default 0.627) |
cl_hud_radar_blur_background |
1 / 0 | Enables radar background blur (effective when background alpha < 1.0, default 1) |
cl_hud_radar_scale |
0.8 - 1.3 | Controls the overall size of the radar (default 1.0) |
cl_radar_scale |
0.25 - 1.00 | Controls radar zoom level (default 0.70) |
cl_radar_scale_alternate |
0.25 - 1.00 | Secondary radar zoom level used when toggled (default 1.0) |
cl_radar_square_with_scoreboard |
0 / 1 | Switches radar to square and shows full map when the scoreboard is open (default 1) |
cl_radar_square_always |
0 / 1 | Forces the radar to be square and show the full map at all times (default 0) |
cl_radar_scale_dynamic |
0 / 1 | Enables automatic radar scaling based on movement and zoom (default 0) |
cl_radar_icon_scale_min |
0.4 - 1.25 | Sets the minimum size of player and object icons on the radar (default 0.60) |
Network & Telemetry
Network and telemetry commands provide live feedback about performance and connection quality. They help you monitor FPS, frame timing, and network conditions while playing. This information is useful for diagnosing stutter, lag, or inconsistent performance without interrupting gameplay.

Detailed guides:
Networks commands
| Command | Values | Description |
|---|---|---|
rate |
98304 - 1000000 | Maximum bytes per second the client can receive from the server (default 786432) |
cl_interp_ratio |
0.0 - 19.0 | Multiplier used to calculate client interpolation delay (default 0.0) |
cl_interp |
The value will set automatically | Sets the minimum interpolation time in seconds (determined automatically by cl_interp_ratio / server updaterate) |
Telemetry commands
| Command | Values | Description |
|---|---|---|
cl_hud_telemetry_frametime_show |
0 / 1 / 2 | Displays frame time telemetry (default 1) |
cl_hud_telemetry_frametime_poor |
1.0 - 100.0 | Frame time threshold (ms) above which performance is flagged as poor (1-100ms; 100ms = ~10 FPS, default 100.0) |
cl_hud_telemetry_ping_show |
0 / 1 / 2 | Displays ping telemetry (default 1) |
cl_hud_telemetry_net_misdelivery_show |
0 / 1 / 2 | Displays percentage of missed user commands and snapshots (default 1) |
cl_hud_telemetry_net_misdelivery_poor |
0 - 100 | Higher anomaly rate than this is flagged as "poor" (default 5) |
cl_hud_telemetry_net_quality_graph_show |
0 / 1 / 2 | Shows a network quality graph (jitter, packet loss, and packet reordering, default 0) |
cl_hud_telemetry_net_detailed |
0 / 1 / 2 | Shows detailed network telemetry (packet loss, late packets, peak jitter, default 0) |
cl_hud_telemetry_serverrecvmargin_graph_show |
0 / 1 / 2 | Displays a graph showing how early or late the server receives client commands (default 0) |
- 0 - Never show
- 1 - Show only when conditions are poor (default)
- 2 - Always show
FPS and Performance
Headlines like "Best FPS commands" or "Best launch options to boost FPS" are, in most cases, pure nonsense - or placebo at best. In CS2, performance is largely determined by hardware, drivers, system configuration, and in-game video settings. Console commands are already tuned conservatively by default and rarely provide direct performance gains.
The commands discussed in this section are not FPS boosters. They are tools for analyzing stability issues such as inconsistent frame delivery, microstutte, or timing-related problems. Their real value comes from comparison: changing one variable, observing the result, and understanding whether performance problems are caused by frame pacing, engine timing, or system-level limitations - not just raw FPS numbers.
In most cases, these commands work by disabling or simplifying non-essential features to reduce overhead. They don’t magically make the game faster, but they can make it more consistent. Sometimes the result is a small FPS increase; more often, it’s smoother gameplay and fewer microstutters.
Related guides:
- How to Boost FPS in Counter-Strike 2: Full Performance & Optimization Guide
- How to Show FPS in Counter-Strike 2 | Full 2026 Guide
- How to Fix FPS Drops, Stutters, and Sync Issues in Counter-Strike 2
| Command | Values | Description |
|---|---|---|
fps_max |
0 - N | Sets the maximum FPS limit. The value 0 removes the cap and lets Source 2 run freely. On many systems this increases average FPS, but can introduce frametime spikes. If micro-stutters appear, a manual cap usually gives smoother frame pacing (default 400.0) |
cl_hide_avatar_images |
0 / 1 | Replaces player avatars with static placeholders. Disabling avatars reduces UI work (default 0) |
cl_allow_animated_avatars |
0 / 1 | Enables or disables animated player avatars. Disabling animated avatars reduces unnecessary UI updates (default 1) |
cl_teamcounter_playercount_instead_of_avatars |
0 / 1 | Replaces team avatars with numbers. This removes avatar rendering entirely and reduces UI overhead, especially noticeable during scoreboard use (default 0) |
r_show_build_info |
0 / 1 | Displays game build information in the corner of the screen. Has no measurable performance impact; however, a clean screen is always nicer (default 1) |
r_drawtracers_firstperson |
0 / 1 | Enables first-person bullet tracers. Disabling tracers slightly reduces visual noise and removes a small rendering overhead during sustained fire (default 1) |
cl_autohelp |
0 / 1 | Enables automatic in-game hint messages. Disabling autohelp removes pointless UI prompts and slightly reduces HUD-related processing (default 1) |
cl_disable_ragdolls |
0 / 1 | Completely disables player ragdoll physics. This reduces CPU usage in firefights and is effective on older or CPU-bound systems (default 0) |
cl_ragdoll_limit |
-1 - 20 | Limits the number of active ragdolls. Lower values reduce CPU and physics load in situations with many deaths (-1 disables limit, 20 default) |
engine_low_latency_sleep_after_client_tick |
0 / 1 | Changes how the engine waits between frames. This can improve frame pacing and reduce input latency in some setups. It is best used with an FPS cap, for example, fps_max 400, not with fps_max 0 (default 0) |
func_break_max_pieces |
0 - 15 | Limits how many fragments breakable objects create. Lower values reduce CPU and GPU load during object destruction (default 15) |
cl_teamid_overhead_mode |
0 / 1 / 2 / 3 | Controls teammate indicators above players. Reducing this removes unnecessary HUD elements and slightly lowers visual clutter (default 3) |
hud_showtargetid |
0 / 1 | Enables display of target names. Disabling removes extra HUD logic and cleans up the screen (default 1) |
Other Commands and Useful Tweaks
This section groups general-purpose commands that don’t fit neatly into crosshair, HUD, network, or performance categories, but are still commonly used in everyday play, testing, and configuration work. These commands are about control and convenience: managing the console, switching servers or maps, adjusting input sensitivity, and handling configs and binds efficiently.
They don’t change game mechanics, but they save time, reduce friction, and make working with the console faster and more predictable.
| Command | Values | Description |
|---|---|---|
clear |
Clears the console output | |
disconnect |
Disconnects from the current server | |
quit |
Exits the game | |
status |
Displays server information, connected players, and their connection details | |
connect <ip:port> |
Connects to a server by IP address | |
cl_showfps |
0 / 1 / 2 / 3 / 4 | Displays FPS and detailed related info (default 0) |
sensitivity |
0.000100 - 8 | Mouse sensitivity (default 1.250) |
zoom_sensitivity_ratio |
0.010 - 3.0 | Mouse sensitivity in zoom (default 1) |
exec <config_name> |
Loads a specified .cfg configuration file |
|
host_writeconfig |
Saves the current configuration to disk | |
map <map_name> |
Loads a local or community map (for example: map de_dust2) |
|
unbind <key> |
Removes the bind from the specified key | |
binddefaults |
Resets all key binds to the default | |
alias "dd" "disconnect" |
Useful alias for quick server disconnect | |
alias "qq" "quit" |
Useful alias to quit the game instantly |
Ready-to-Use CS2 Practice Configs and Gameplay Configs
This section is dedicated to convenience, specifically configuration files. Instead of typing the same console commands every time, configuration files allow you to group related commands and load them instantly. In CS2, practice configs are especially useful because they let you switch between different training scenarios without restarting the game or rebuilding the setup from scratch.
How to Create and Load a Personal Config
A personal config is a simple text file that contains console commands executed together. Configs give you full control over when and how specific settings are applied. You can create multiple configs for different purposes - gameplay, practice, testing, or experimentation - and load them on demand.
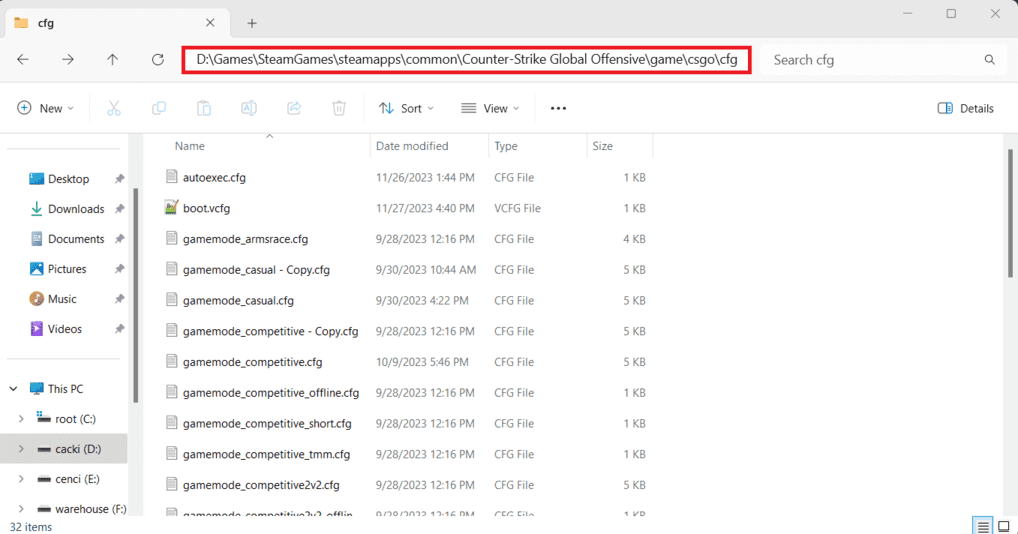
CS2 configuration files are stored in the following folder:
..\steamapps\common\Counter-Strike Global Offensive\game\csgo\cfg\To create a new config:
- Create a new text file in the cfg folder (for example, config.txt)
- Add your commands, binds, or scripts
- Rename the file extension from .txt to .cfg (for example, config.cfg)
Once saved, the config is ready to be used in-game.
Configs can be loaded manually or automatically. You can execute them through the console, run them via Steam launch options, or include them in autoexec.cfg. Each method behaves slightly differently, depending on when the commands are executed during game startup.
Load Config Using the Console
Before loading any config, make sure the developer console is enabled.
- Launch the game and go to Settings -> Game
- Set Enable Developer Console to Yes
- Press the
~key (default) to open the console
Type: exec config.cfg. Press Enter and close the console.
This method is ideal for quick testing or switching between configs during a session. Any .cfg file located in the cfg folder can be loaded this way.
Load Config Using the Launch Options
Steam launch options allow some console commands to be executed automatically when the game starts. Any command added here must begin with a + symbol.

To add a configuration to the launch options:
- Open Steam and go to your Library
- Right-click on Counter-Strike 2 and select Properties
- On the General tab, find Launch Options
- Add the following command (to the end of the line if there are already other launch options):
+exec config.cfg
This will execute the config every time the game starts.
Launch options are processed after autoexec.cfg. If the same command exists in both files, the launch option value will override the autoexec value.
Load Config Using autoexec.cfg
autoexec.cfg is a regular configuration file that CS2 automatically executes on startup. Unlike other configs, it does not require manual execution or launch parameters.
By default, autoexec.cfg does not exist and must be created manually. It is commonly used to store persistent commands, key binds, and scripts or to load other configuration files.
To create autoexec.cfg:
-
Navigate to the CS2 config folder:
..\steamapps\common\Counter-Strike Global Offensive\game\csgo\cfg\ - Create a new file named autoexec.txt
- Add your commands, binds, scripts, or configuration file, like:
exec config.cfg - Rename the file to autoexec.cfg (make sure it is not autoexec.cfg.txt)

Once created, autoexec.cfg will run automatically every time CS2 launches. No additional setup is required.
One reason to include cl_showfps 1 in autoexec.cfg is quick verification. Since the FPS counter appears directly in the main menu, you don’t need to load a map to confirm that the file was executed. If the FPS counter is visible, autoexec.cfg loaded correctly.
Gameplay Config for Clean HUD & Stable FPS
This is a stable FPS / low-stutter gameplay config (not a miracle boost). The config is focused on performance stability and reduced visual overhead, not artificial "FPS boost" claims. It disables a number of non-essential HUD elements, visual effects, and background features that add load to the engine without affecting core gameplay.
Several commands in this config are specifically aimed at reducing GPU and CPU overhead in common combat scenarios. For example, disabling first-person bullet tracers and limiting breakable object debris helps lower rendering and physics load during firefights and explosions. On some systems, this does not significantly increase average FPS - but it often reduces frame-time spikes and raises the minimum FPS, which is far more important for perceived smoothness.
As a result, the game may feel more consistent and responsive, especially in situations where micro-stutters previously occurred: intense gunfights, grenade explosions, or crowded areas. This is not a "+50 FPS" config, but a stability-oriented performance setup designed to smooth out frame delivery rather than inflate numbers.
Radar, crosshair, and HUD settings are configured in a balanced, competitive-friendly way, prioritizing clarity and fast situational awareness without unnecessary on-screen noise.
If you want to free up additional screen space and slightly reduce UI overhead, you can replace player avatars with numeric indicators. To enable this, remove the comment markers (//) from the following command inside the config:
cl_teamcounter_playercount_instead_of_avatars 1This removes avatar icons and replaces them with simple player counts, which can help keep the HUD cleaner and easier to read, especially on smaller displays.
Commands and Values
//init
developer 0
mm_dedicated_search_maxping 75
sv_party_mode 0
volume 0.6
sensitivity 1.9
cl_sniper_auto_rezoom 0

//FPS
// Sets the maximum in-game FPS cap, where 0 removes the limit. Values [0-N], default 400.
fps_max 0

// Sets the maximum FPS cap for tools and menus. Values [0-N], default 120.
fps_max_tools 200

// Limits how many fragments breakable objects can create. Values [0-15], default 15.
func_break_max_pieces 0

// Enables first-person bullet tracers. Values [0/1], default 1.
r_drawtracers_firstperson 0

// Hides player avatar images to reduce UI overhead. Values [0-2], default 0.
cl_hide_avatar_images 1

// Animated avatars in the UI. Values [0/1], default 1.
cl_allow_animated_avatars 0

// Replaces team avatars with player counts on the scoreboard. Values [0/1], default 0.
//cl_teamcounter_playercount_instead_of_avatars 1

// Enables automatic hint messages in-game. Values [0/1], default 1.
cl_autohelp 0

// Disables player ragdoll physics after death. Values [0/1], default 0.
cl_disable_ragdolls 1

// Limits how many ragdolls can remain active at once. Values [-1-20], default 20.
cl_ragdoll_limit 5

// Controls teammate indicators shown through walls. Values [0-3], default 3.
cl_teamid_overhead_mode 1


// Shows or hides target name information. Values [0/1], default 1.
hud_showtargetid 0

// Shows build information in a corner of the screen. Values [0/1], default 1.
r_show_build_info 0

//Network
rate 1000000
cl_interp_ratio 1

//Telemetry
cl_hud_telemetry_frametime_show 1
cl_hud_telemetry_frametime_poor 100.0
cl_hud_telemetry_net_detailed 0
cl_hud_telemetry_net_misdelivery_poor 5.0
cl_hud_telemjetry_net_misdelivery_show 0
cl_hud_telemetry_net_quality_graph_show 0
cl_hud_telemetry_ping_poor 100.0
cl_hud_telemetry_ping_show 0
cl_hud_telemetry_serverrecvmargin_graph_show 0

//HUD and radar
cl_radar_scale 0.50
cl_hud_radar_scale 1.1
cl_radar_scale_dynamic 0
cl_radar_always_centered 0
cl_radar_rotate 1
cl_radar_icon_scale_min 0.7
cl_radar_square_with_scoreboard 0
cl_radar_square_always 0
cl_radar_square_with_scoreboard 0
cl_hud_radar_blur_background 1
cl_hud_radar_map_additive 1
cl_hud_color 0
cl_hud_radar_background_alpha 0.627000
cl_weapon_selection_rarity_color 1

//Sight
crosshair 1
cl_crosshair_drawoutline 1
cl_crosshair_outlinethickness 1.037287
cl_crosshair_recoil 0
cl_crosshair_sniper_width 2
cl_crosshair_t 0
cl_crosshairalpha 200
cl_crosshaircolor 5
cl_crosshaircolor_b 0
cl_crosshaircolor_g 255
cl_crosshaircolor_r 0
cl_crosshairdot 1
cl_crosshairgap -1.790851
cl_crosshairgap_useweaponvalue 0
cl_crosshairsize 0.300000
cl_crosshairstyle 4
cl_crosshairthickness 0.835233
cl_crosshairusealpha 1

echo The config.cfg file has been executed!
Download config.cfg Config file
Practice config (e.g., bots.cfg)
This config is designed for general offline practice with high-difficulty bots. It groups together commands used to control round flow, time limits, buy rules, bot behavior, and basic training utilities. The goal is to create a repeatable and controlled practice environment without having to manually reconfigure the server every time.
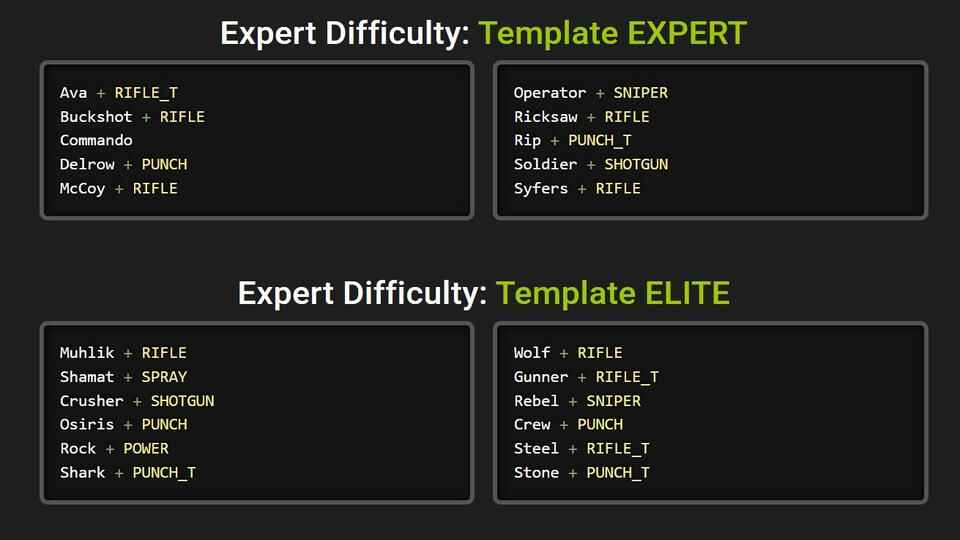
Due to CS2 limitations, it is not possible to spawn expert or elite-level bots directly through map loading options. For this reason, this config must be executed after the map is loaded, using the in-game console. The setup assumes the player is on the Terrorist side: 6 easy-level Terrorist bots plus the player versus 13 expert-level Counter-Terrorist bots. You can adjust this balance or create a mirrored version for the Counter-Terrorist side if needed.
Elite-level bots can only be spawned by adding them explicitly by name, which requires additional setup. For a detailed explanation of bot difficulty levels, bot naming, templates, and weapon behavior in CS2, see the following guides:
This config also includes several training key binds to speed up practice and testing. Cheats mode is disabled by default, but individual cheat-dependent commands are embedded directly into specific binds. For demonstration purposes, multiple commands are bound to the same key, which is technically valid - however, only the last bind for a key will take effect.
You should reassign these binds to keys that are comfortable for you. If a bind is not needed, you can disable it by commenting it out (//) or removing it entirely.
Commands and values
//Server
sv_showimpacts 2
sv_showimpacts_time 5
sv_showbullethits 1
sv_maxspeed 320
mp_warmuptime 5
mp_freezetime 3
mp_limitteams 0
mp_autoteambalance 0
mp_buytime 120
mp_buy_anywhere 1
mp_maxmoney 16000
mp_startmoney 5000
mp_roundtime 2.5
mp_maxrounds 24
mp_timelimit 20
mp_c4timer 40
mp_friendlyfire	1

// Binds
// !Do not forget to reassign the "C" key to a key that is comfortable for you
// !Remove the comment prefix (//) to activate a bind
//bind "c" "sv_cheats 1"                                        // Cheats mode ON
//bind "c" "sv_cheats 0"                                        // Cheats mode OFF
//bind "c" "toggle sv_cheats"                                   // Cheats mode ON / OFF
//bind "c" "sv_cheats 1; noclip"                                // Fly mode ON
//bind "c" "toggle sv_cheats; noclip"                           // Fly mode ON / OFF
//bind "c" "toggle sv_cheats; toggle sv_regeneration_force_on"  // Regeneration
//bind "c" "toggle sv_cheats; toggle cl_showpos"                // Show current position (coordinates)
//bind "c" "toggle sv_cheats; toggle cl_player_proximity_debug" // Numbers on player feet (debug)
//bind "c" "toggle cl_draw_only_deathnotices"                   // Hide HUD except crosshair and death notices
//bind "c" "toggle sv_cheats; toggle cl_drawhud"                // Completely disable HUD


//Restart bots
bot_kick
bot_autodifficulty_threshold_low -99
bot_autodifficulty_threshold_high 99
bot_difficulty 3

//6-T 13-CT
bot_add_t easy
bot_add_t easy
bot_add_t easy
bot_add_t easy
bot_add_t easy
bot_add_t easy
bot_add_ct expert
bot_add_ct expert
bot_add_ct expert
bot_add_ct expert
bot_add_ct expert
bot_add_ct expert
bot_add_ct expert
bot_add_ct expert
bot_add_ct expert
bot_add_ct expert
bot_add_ct expert
bot_add_ct expert
bot_add_ct expert

echo The bots.cfg has been executed!Jump Throw and Regular Nades Practice Config (e.g., nades.cfg)
This config is designed specifically for grenade practice. It combines commands that help analyze grenade trajectories, timing, and positioning in a controlled environment. The goal is to make grenade training repeatable and efficient, without manual setup between attempts.
When loaded, this configuration enables a focused practice setup with several useful key binds: free movement for positioning checks, on-screen position data for precise lineup alignment, and the ability to instantly rethrow the last grenade. This allows you to test the same throw multiple times, compare results, and fine-tune lineups until they become consistent.
The config is suitable for practicing both regular throws and jump throws, making it useful for learning new lineups as well as refining existing ones.
Commands and Values
//Server
sv_maxspeed 320
mp_warmuptime 3600
mp_buytime 3600
mp_buy_anywhere 1
mp_maxmoney 16000
mp_startmoney 16000

//Nades
sv_cheats 1
sv_infinite_ammo 1
sv_grenade_trajectory_prac_pipreview 1
sv_grenade_trajectory_prac_trailtime 8
sv_showimpacts 1
ammo_grenade_limit_total 5

// !Do not forget to reassign the "C" key to a key that is comfortable for you
bind "c" "toggle sv_cheats; noclip"             // Fly mode ON
bind "c" "toggle sv_cheats; toggle cl_showpos"  // Show current position (coordinates)
bind "c" "sv_cheats 1; sv_rethrow_last_grenade" // Rethrow last grenade

echo The nades.cfg has been executed!
Download nades.cfg Config file
Bunnyhop practice config (e.g., bunny.cfg)
This config is intended only for movement practice, specifically for learning and testing bunnyhopping mechanics in CS2. It removes stamina penalties, increases air acceleration, and enables automatic bunnyhopping to create a controlled environment where movement behavior is easy to observe and repeat.
This setup is not representative of matchmaking or Premier servers. Its purpose is training and experimentation: understanding timing, air control, and how CS2 movement physics behave under relaxed constraints.
Commands and Values
sv_maxspeed 1000
sv_enablebunnyhopping 1
sv_autobunnyhopping 1
sv_staminajumpcost 0
sv_staminalandcost 0
sv_airaccelerate 100
mp_warmuptime 3600
mp_buytime 3600
mp_buy_anywhere 1
mp_maxmoney 16000
mp_startmoney 16000CS2 Console Commands FAQ

Do console commands work in matchmaking and Premier?
Some do, some don’t. Commands that only adjust your UI, crosshair, or client-side behavior usually work everywhere. Commands that change game rules, physics, or server behavior are ignored outside local servers and practice modes.
Can console commands improve FPS in CS2?
Not in a direct or dramatic way. CS2 performance is mostly defined by hardware, drivers, and video settings. Console commands are mainly useful for stability, testing, or reducing minor overhead – not for unlocking hidden FPS.
Why do some commands appear in cvarlist but don’t work?
Because cvarlist shows everything the engine exposes, including read-only, internal, or server-restricted variables. A command existing does not guarantee it can be changed or will have an effect in your current context.
Are old CS:GO console commands still relevant in CS2?
Most are not. Many legacy CS:GO commands were removed, renamed, or locked internally in CS2. Copying old configs often results in commands that do nothing.
Do I need sv_cheats for practice commands?
Only for commands that explicitly require it. Basic practice setup commands work without sv_cheats, while experimental or rule-breaking commands require it and only function on local servers.
Is it safe to use console commands online?
Yes. Using console commands does not result in bans. The only limitation is whether a command is allowed to run in that environment. If it isn’t, the game simply ignores it.
Why does a command work in practice but not in a real match?
Because execution context matters. Local servers and practice sessions allow more control. Matchmaking and Premier restrict commands that could affect fairness or game rules.
Should I put everything into autoexec.cfg?
No. Autoexec should contain only your core, always-on settings. Practice, testing, and experimental commands are better kept in separate configs that you load manually.
How do I know if a command actually does something?
Test it in isolation. Change one command at a time and observe whether it produces a visible or measurable effect. If nothing changes, the command is likely irrelevant for your setup.