What is a Bind?
In Counter-Strike 2, a bind is a console command that connects a specific action to a key or mouse button. Instead of relying only on the default layout, you can customize your controls so that every movement, buy, or utility action feels natural. Want to jump with the mouse wheel, crouch with a side button, or buy grenades with a single press of F1? All of that is possible through binds.
The true value of binds is speed and consistency. With the right setup, you can react instantly in duels, throw grenades without breaking focus, or execute advanced actions that the standard menu doesn’t allow. A few well-chosen key binds won’t turn you into a pro overnight, but they make the game feel smoother, faster, and more tailored to your playstyle.
Why Binds Matter
Binds in CS2 touch every part of the game:
Utility binds make grenade usage more reliable - like the classic jump-throw bind for smokes or combining jump and crouch for smoother movement.
A lot of players rely on binds because they remove friction. Instead of wasting energy on menus or awkward key combos, you can focus on positioning, timing, and decision-making. You’ll never lose a round because you got stuck in the buy menu or mistimed a grenade.
In short, binds are one of the easiest ways to optimize your Counter-Strike 2 experience. They’re fully legal, safe to use in Competitive and Premier, and supported by the game’s console and config system. Mastering them takes little effort but pays off in every match.
Syntax for Bind
At its core, the bind command in CS2 follows this format:
bind "[key/button]" "[action/s]"
[key/button] -> the key or mouse input you want to assign.
[action/s] -> the console command(s) that will run when you press that key.
Do you always need quotation marks?
For the key on the left, quotes are optional. For the right command side, if you bind a single action, you can skip quotes. If you bind multiple actions, quotes are mandatory, and commands must be separated with a semicolon (;).Example: Single Bind
A simple bind to make the spacebar your jump key:
bind "space" "+jump"   // preferred
bind space +jump       // not nice =)
Example: Multi-Bind
One key can trigger several actions at once. For example, pressing C will buy an AWP, adjust sensitivity, and send a team chat message:
bind "c" "buy awp; sensitivity_y_scale 0.6; say_team I'm Sniper!"
Here’s what happens step by step:
buy awp -> purchases an AWP
sensitivity_y_scale 0.6 -> lowers vertical sensitivity for better control
say_team I'm Sniper! -> sends a quick team chat message so everyone knows your role
The semicolon ; separates each command. Adding one at the very end is optional - it won’t break the bind if you do.
Common Keyboard and Mouse Inputs
- mouse1, mouse2, mouse3 -> left, right, and middle mouse buttons
- mwheelup, mwheeldown -> scroll wheel up or down
- space, ctrl, shift, a-z, 0-9 -> standard keyboard keys
- kp_end, kp_ins, kp_home, etc. -> numpad keys (useful for extra binds)
How to Add Binds in CS2
There are several ways to add and save binds in Counter-Strike 2. All methods work, but each has its own advantages. For beginners the in-game console is enough, while experienced players usually prefer .cfg files or an autoexec.cfg for long-term setups.
Using the Developer Console

The fastest way to create a bind is directly through the developer console. Open it (default key: ~) and type:
bind "key" "command"For multiple commands:
bind "key" "command1; command2; command3"Examples:
bind "c" "cl_showfps 1"
bind "c" "cl_showfps 1; echo FPS counter activated"
This assigns the c key to display your FPS and also prints a confirmation message in the console.
Unlike in CS:GO, CS2 automatically saves binds to your account config file:
..\Steam\userdata\SteamID\730\local\cfg\cs2_user_keys_0_slot0.vcfg
If you want to ensure all changes (not just binds) are saved, type:
host_writeconfigThis command overwrites your current config with everything you changed during the session.
👉 For a full breakdown of where configs live and how they interact, see my guide: Optimizing Counter-Strike 2 Player Configuration Files.
Using a Custom .cfg File
Creating your own config file gives you more control. Here’s how:
- Navigate to your CS2 config folder:
..\steamapps\common\Counter-Strike Global Offensive\game\csgo\cfg\ - Create a new text file. Name it something simple (letters, numbers, underscores or dashes are fine). Example:
myconfig.txt - Change the file extension from .txt to .cfg:
myconfig.cfg
(If you don’t see extensions, enable them in Windows: Control Panel -> File Explorer Options -> View -> uncheck Hide extensions for known file types box)
- Open the file, paste your binds, and save.
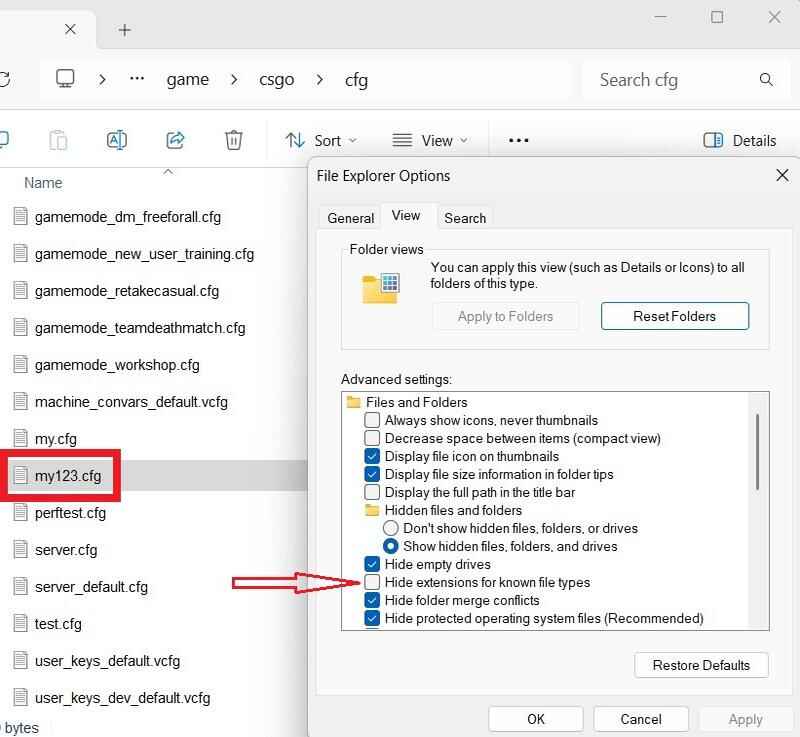
Now the file can be executed in two ways:
Through the console (manual method)
Launch CS2 -> open the console (~) -> type:
exec myconfig.cfgHit Enter and your binds will load immediately, even mid-match.
Through launch options (auto method)

If you want your config to load every time you launch CS2:
Right-click Counter-Strike 2 in your Steam Library -> Properties.
Under Launch Options, add:
+exec myconfig.cfgNow your config executes automatically at startup.
Using the autoexec.cfg File (permanent method)

The most reliable way to keep binds forever is with an autoexec.cfg. This file loads automatically every time CS2 starts, no extra steps required.
- Go to your config folder:
..\steamapps\common\Counter-Strike Global Offensive\game\csgo\cfg\ - Create a new text file, rename it to:
autoexec.cfg - Add all your personal binds and commands, then save.
That’s it. Next time you launch CS2, your binds will load automatically. Unlike a custom .cfg file (e.g., myconfig.cfg), you don’t need to add +exec autoexec.cfg to your launch options - CS2 runs it by default.
F.A.Q.

Do I need to enable the developer console for binds?
Yes. Go to Settings -> Game and set Enable Developer Console to Yes. Then choose a key (default is ~) to open it. Without the console, you can’t add or edit binds.
Are binds safe to use in Competitive or Premier?
Absolutely. All standard binds in CS2 are 100% safe and supported by the game. You will not get VAC banned for using them.
Can I use both spacebar and mousewheel for jump?
Yes. If you don’t unbind the spacebar, it will remain active. Many players use both at the
same time for consistency.
How do I reset all my binds to default?
Type binddefaults in the console. This restores the original key layout. If you only want to
free up one key, use unbind key.
Where are my binds stored?
CS2 automatically saves binds to your account config file:
..\Steam\userdata\[SteamID]\730\local\cfg\cs2_user_keys_0_slot0.vcfg
For permanent safety, keep a backup in an autoexec.cfg.
What if I want to restore my mousewheel to weapon switching?
Use:
bind "mwheelup" "invprev"
bind "mwheeldown" "invnext"
This brings back the default weapon scroll.
Can I bind multiple actions to a single key?
Yes. Separate commands with a semicolon:
bind "c" "buy ak47; buy vest; say_team Buying AK + Armor!"Just remember that binds overwrite whatever was on that key before.
Do pros actually use binds?
Yes. Professional players rely on binds for buy shortcuts, movement consistency, and practice scripts. It’s not a cheat or trick - it’s simply optimizing the game so they can focus on strategy and aim.