FPS in Counter-Strike 2: A Complete Guide 2025
Achieving high FPS (Frames Per Second) is crucial for any gamer looking to dominate in Counter-Strike 2. In competitive gaming, even the smallest performance issues can make the difference between victory and defeat. This guide is designed to help you understand FPS, why it matters, and how to optimize it for smooth and responsive gameplay. Whether you’re a seasoned player or new to CS2, you’ll find actionable tips to maximize performance and gain the competitive edge you need. Let’s explore it together!
What Is FPS and Why Does It Matter in Counter-Strike 2?
FPS, or Frames Per Second, in Counter-Strike 2 measures how many times the game refreshes the image on your screen every second. A higher FPS means smoother animations, quicker responses, and reduced input lag, making your gameplay experience more fluid and enjoyable. This responsiveness is critical in competitive gaming, where every millisecond counts.
Conversely, low FPS can lead to choppy visuals and delayed inputs, disrupting precision and timing—essential factors in fast-paced combat scenarios. By maintaining high FPS, players not only enjoy smoother visuals but also gain a competitive edge, improving both performance and overall gaming experience.
Monitor Refresh Rate vs. FPS
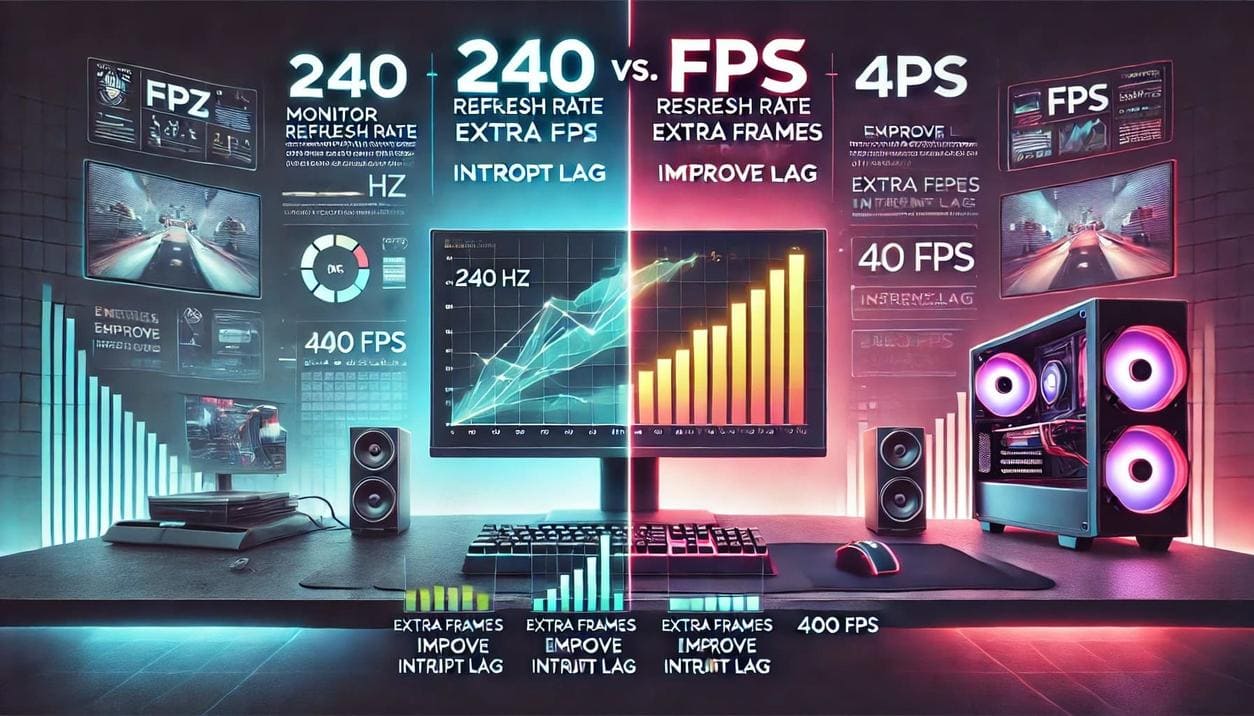
Your monitor’s refresh rate, measured in Hertz (Hz), determines how many frames it can display per second. For example, a 240 Hz monitor can show up to 240 FPS, even if your GPU generates 400 FPS. While extra frames aren’t directly visible, higher FPS reduces input lag, improving responsiveness even on lower refresh-rate displays.
How to Check FPS in Counter-Strike 2?
In-Game Console Commands:
cl_showfps 1
cl_hud_telemetry_frametime_show 1
Steam Settings:
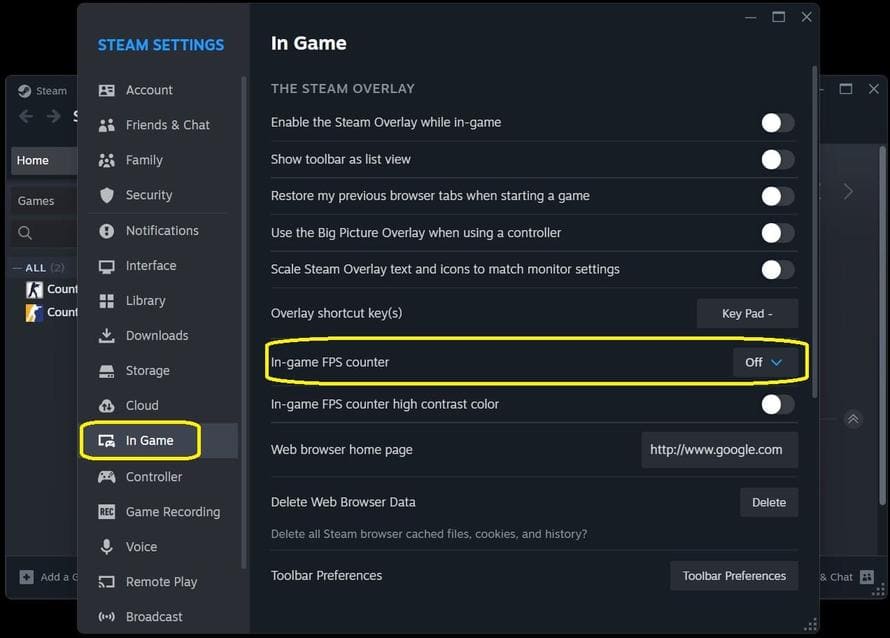
Enable “In-Game FPS Counter” from the Steam settings under the “In-Game” tab.
Third-Party Software:
Tools like Fraps can show FPS but require disabling CS2’s trusted mode with the -allow_third_party_software launch option.
Improving FPS in Counter-Strike 2
To enhance your FPS in Counter-Strike 2, you can follow these steps to optimize your operating system and game settings for maximum performance. Keep in mind that some solutions may vary in effectiveness depending on your system.
Update Your System and Drivers
Ensure that your operating system, BIOS, and drivers are all up to date. Use official tools such as MyAsus, Dell Command Update, or HP Assistant for efficient updates. Keeping your system updated is crucial for improved stability and performance.
Optimize Energy Consumption for Maximum Performance
Adjust your system’s power settings for better performance.
Enable High-Performance Plan:
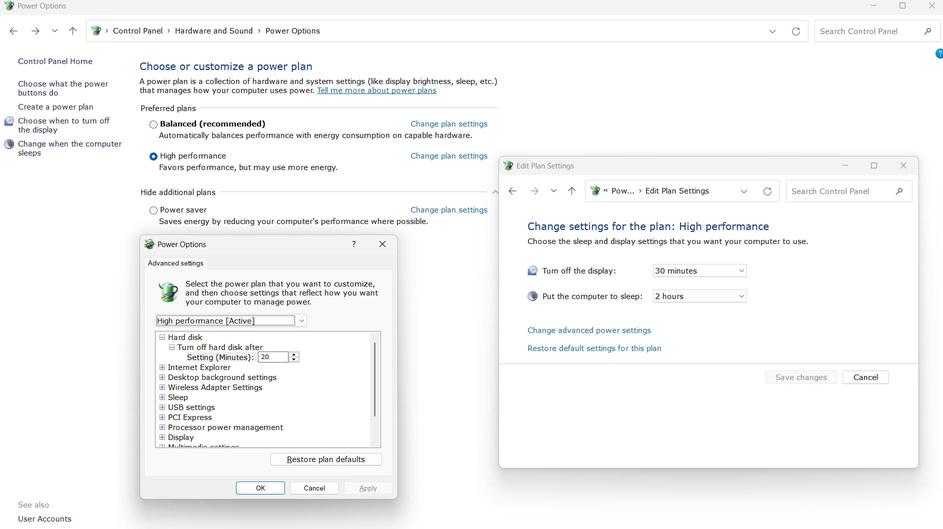
Open the Run Dialog by pressing Win + R, type control, and press Enter to access the Control Panel.
Navigate to Hardware and Sound > Power Options.
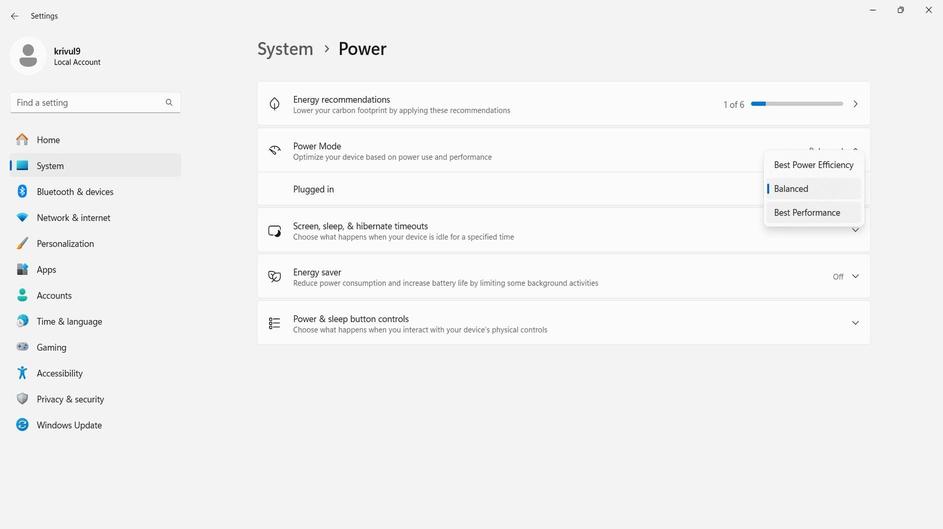
Under Preferred Plans, select High Performance. If it’s not visible, expand hidden plans by clicking Show additional plans.
For advanced customization, click Change plan settings and then Change advanced power settings.
Software Optimization
Optimizing your software setup is one of the most effective ways to boost performance and FPS in Counter-Strike 2. By reducing unnecessary resource usage, you allow your system to allocate more power to the game, resulting in smoother gameplay and faster response times.
Close Background Applications:
Free up resources by closing unnecessary apps like messengers, media players, cloud services, and browsers running in the background.
Disable Unnecessary Startup Programs:
Open Task Manager (Win + R, type taskmgr, or press Ctrl + Shift + Esc).
Go to the Startup tab and disable non-essential programs.
For deeper optimization, open the Windows Registry (Win + R, type regedit) and navigate to these paths to remove unwanted entries:
HKEY_CURRENT_USER\Software\Microsoft\Windows\CurrentVersion\Run
HKEY_LOCAL_MACHINE\SOFTWARE\Microsoft\Windows\CurrentVersion\Run
HKEY_LOCAL_MACHINE\SOFTWARE\WOW6432Node\Microsoft\Windows\CurrentVersion\Run
Uninstall Unnecessary Programs:
Use the Control Panel (Win + R, type control, then go to Programs > Uninstall a program) to remove unneeded software.
Alternatively, go to Settings > Apps > Installed Apps (Win + I) to uninstall unnecessary applications directly.
Optimize Visual Effects
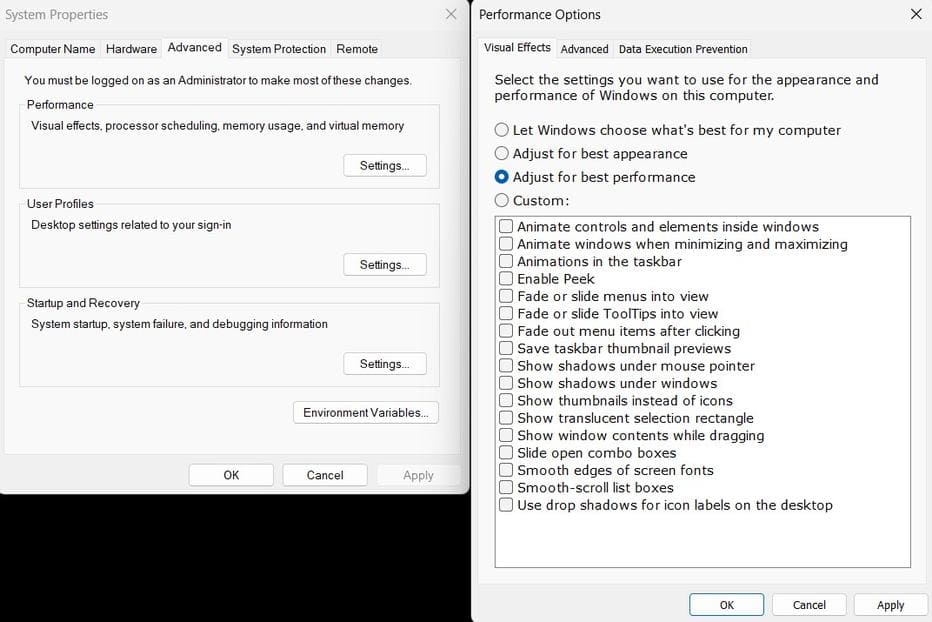
Adjust visual effects to prioritize performance over appearance.
Open System Settings (Win + I), navigate to the System tab, and click About at the bottom.
Under Related Links, select Advanced system settings.
In the new window, go to the Advanced tab and click Settings under the Performance section.
In the Performance Options window, choose the Visual Effects tab, select Adjust for best performance, and click OK.
Disabling Unnecessary Services
After disabling startup software, it’s also worth reviewing and disabling unnecessary services to improve your computer’s boot speed and overall performance. Many services are automatically enabled during software installation, which can impact system resources. While disabling inactive services won’t reduce the number of processes, it can free up RAM and enhance system efficiency.
Before proceeding, it is highly recommended to create a system restore point and back up your registry.
Important
Here is a list of commonly unnecessary services and recommendations for disabling them based on your usage.
					AJRouter
//Disable if you don’t use the AllJoyn Router service.

Fax
//Disable if you don’t use a fax machine.

Geolocation Service
//Disable if you don’t use applications or features that require location data.

Hyper-V Services
//Disable if you don’t use Hyper-V virtualization or virtual machines.

Telephony
//Disable if you don’t use telephony, VoIP, modems, or related applications.

Sensor Services
//Disable if you don’t use hardware sensors or sensor-dependent apps.

Windows Error Reporting
//This service allows manufacturers to access error reports. Disable if unnecessary.

Connected User Experiences and Telemetry
//This service collects data about your device and sends it to Microsoft. Disable to prevent data collection.

Bluetooth Support Service
//Disable if you don’t use Bluetooth devices.

Downloaded Maps Manager
//Disable if you don’t use the Bing Maps app or offline maps.

Parental Controls
//Disable if you don’t share your PC with children or use parental controls.

Windows Image Acquisition
//Disable if you don’t use physical scanning devices.

Windows Camera Frame Server
//Disable if you don’t use a webcam.

Windows Insider Service
//Disable if you are not part of the Windows Insider Program.

BitLocker Drive Encryption Service
//Disable if you don’t use BitLocker for storage encryption.

Computer Browser
//Disable if you don’t need network discovery for systems on the local network. Network discovery can still be performed manually.

Distributed Link Tracking Client
///Disable if you don’t work in a corporate or network environment that requires file tracking.

Internet Connection Sharing (ICS)
//Disable if you don’t share your internet connection with other devices.

Netlogon
//Disable if your computer is not part of a domain network.

Print Spooler
//Disable if you don’t use physical printers.

Windows Search
//Disable if you don’t rely on the Windows Search feature.

Windows Update
//Disable if your system is up-to-date and you prefer manual updates.

Xbox Services
//Disable if you don’t use Xbox or Xbox Live features on your PC.
System Cleanup
Regular system cleanup can significantly enhance file system performance. Follow these steps to remove unnecessary files, caches, and unused devices or drivers.
Clear Temporary Files
Press Win + R, type temp, and press Enter. Delete all files in the opened folder.
Press Win + R, type %temp%, and press Enter. Delete all files in this folder as well.
Remove Traces of Uninstalled Programs
Check the following directories for leftover files from uninstalled programs:
C:\Users\Your_Account_Name\AppData\Local\
C:\Users\Your_Account_Name\AppData\Roaming\
Remove Unused Devices in Device Manager
Open Device Manager by pressing Win + R, typing devmgmt.msc, and pressing Enter.
Alternatively, press Win + I, type “Device Manager,” and open it.
In the View menu, enable Show hidden devices. Uninstall any unused or greyed-out devices.
Run Disk Cleanup
Press Win + R, type cleanmgr, and press Enter.
In the Disk Cleanup window, click Clean up system files and select all unnecessary files for deletion.
Game Mode and Graphics Settings
Modern Windows systems come equipped with Game Mode, which enhances gaming performance by prioritizing CPU and GPU resources for games. It minimizes background activities and reduces distractions like pop-ups and updates. Additionally, Graphics Settings in Windows allow users to optimize GPU performance for specific applications, improving responsiveness and reducing latency.
By enabling Game Mode and configuring Graphics Settings, you can optimize your Windows system for smoother and more responsive gameplay in Counter-Strike 2.
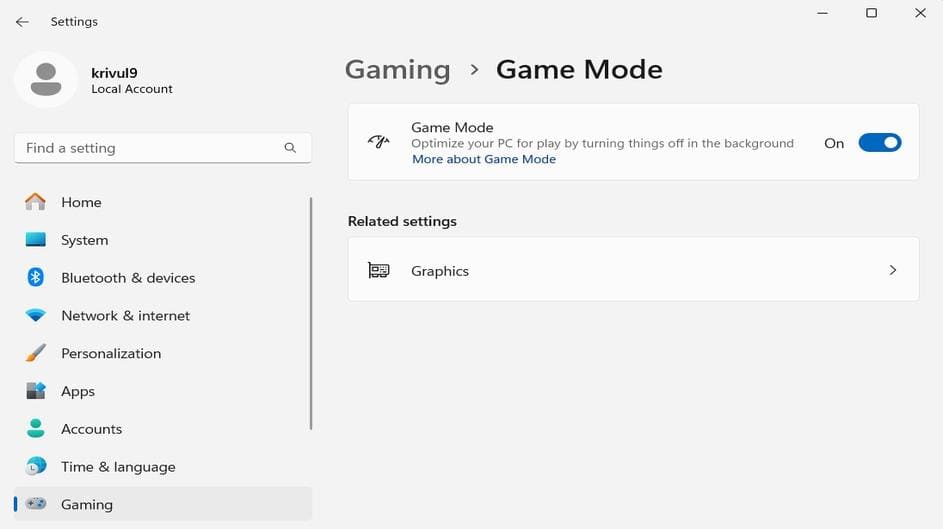
Game Mode
Open System Settings by pressing Win + I.
Navigate to Gaming > Game Mode.
Toggle the Game Mode switch to On.
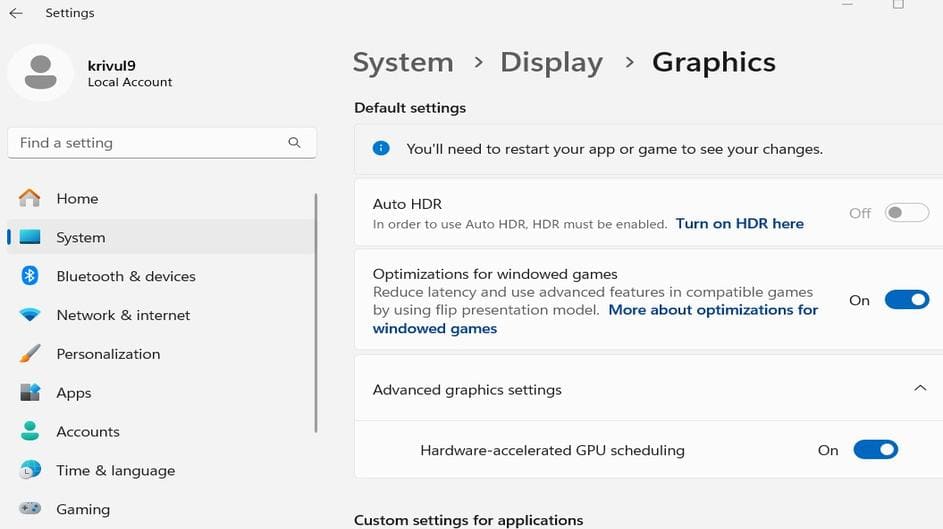
Graphics Settings
Open System Settings by pressing Win + I.
Navigate to Gaming > Game Mode > Graphics > Advanced Graphics Settings.
Enable Hardware-accelerated GPU scheduling to let your GPU independently manage video memory and tasks. This reduces CPU load, improves performance, and minimizes latency.
Now, need to add the Counter-Strike 2 executable (cs2.exe) to the Graphics Settings list.
Click on Add desktop app > Locate and add the cs2.exe file > Set its GPU preference to High Performance.
You can verify if Game Mode is active in Counter-Strike 2 console.
Use the sys_info command and look for the next line:
Windows Game Mode: active.
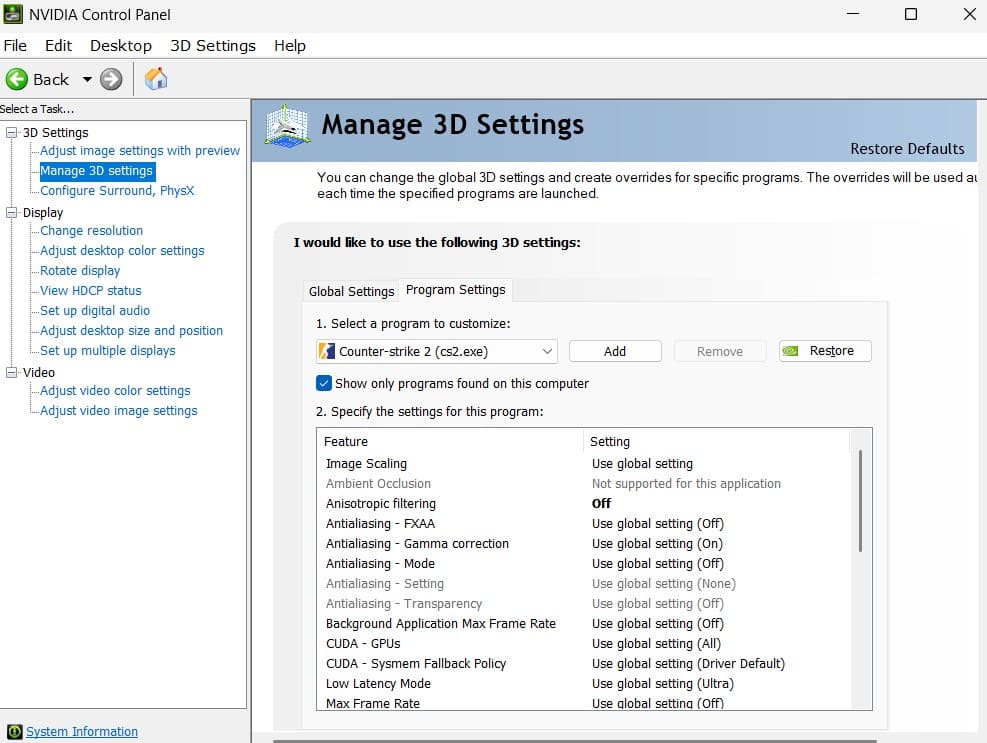
Nvidia Graphics Card Settings
To optimize Counter-Strike 2 performance using an Nvidia graphics card, follow these steps:
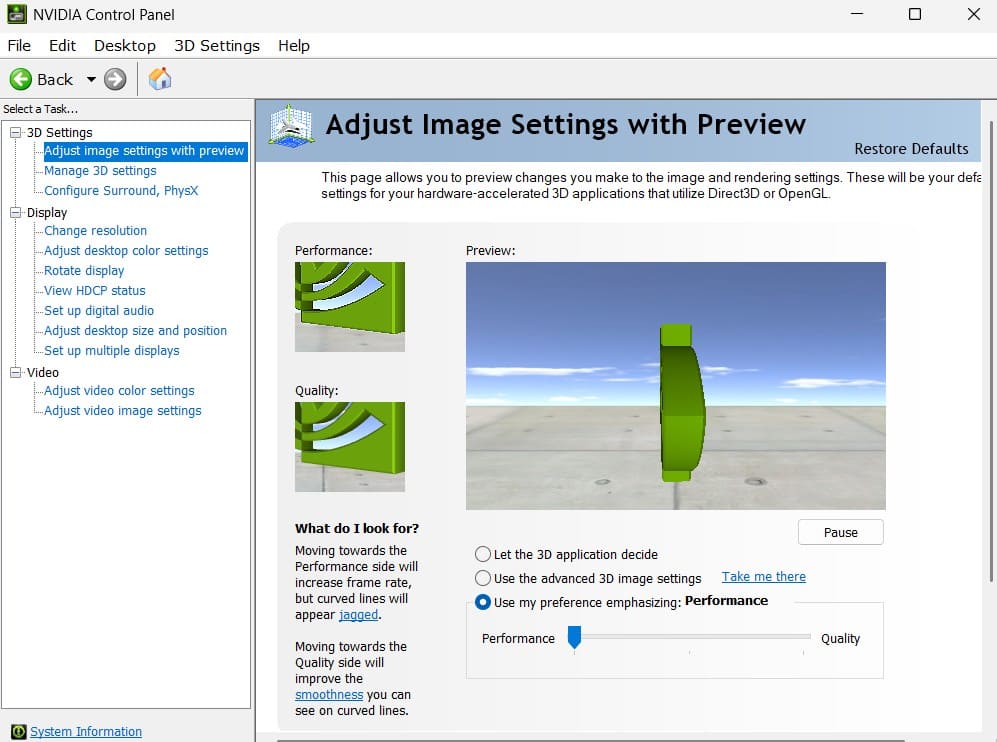
- Adjust Image Settings for Performance
Open the Nvidia Control Panel: Right-click on the desktop and select Nvidia Control Panel.
In the left-hand menu under 3D Settings, click Adjust image settings with preview.
On the right, select Use my preference emphasizing and move the slider to the left for Performance.
					Image Scaling   Off:
//Upscaling isn’t needed; play at the native resolution for optimal performance.

Anisotropic Filtering   Off:
//Enhances texture clarity on slanted surfaces; unnecessary for CS2.

Antialiasing – FXAA   Off:
//Avoids blurring caused by FXAA; use in-game anti-aliasing methods instead.

Antialiasing – Gamma Correction   On:
//Improves lighting and color quality without major performance impact.

Antialiasing – Mode   Off:
//Disables external anti-aliasing settings.

Antialiasing – Transparency   Off:
//Reduces GPU load by disabling anti-aliasing for transparent textures.

Background Applications Max Frame Rate   Off:
//Limit background app FPS to 20 if you run other applications during gameplay.

CUDA – GPUs   All:
//Select all available GPUs for maximum performance.

DSR – Factors   Off:
//Avoid additional GPU load; use your monitor’s native resolution.

Low Latency Mode   Ultra:
//Minimizes input delay, ideal for competitive gaming. If it causes instability (e.g., FPS stuttering), set it to On.

Max Frame Rate   Off:
//Configure frame rate limits within Counter-Strike 2 instead.

Multi-Frame Sampled AA (MFAA)   Off:
//Unnecessary for CS2’s performance and visual quality.

OpenGL GDI Compatibility   Performance:
//Improves OpenGL performance.

OpenGL Rendering GPU   Nvidia:
//Select your primary graphics card.

Power Management Mode   Performance:
//Ensures stable FPS by prioritizing performance.

Preferred Refresh Rate   Highest:
//Uses your monitor's maximum refresh rate for smoother gameplay.

Texture Filtering – Anisotropic Sample Optimization   On:
//Improves performance without noticeable quality loss.

Texture Filtering – Negative LOD Bias   Allow:
//Manages texture detail effectively.

Texture Filtering – Quality   Performance:
//Prioritizes performance over visual quality.

Texture Filtering – Trilinear Optimization   On:
//Optimizes texture filtering for better performance.

Threaded Optimization   On:
//Enables multi-threading for improved game performance.

Triple Buffering   Off:
//Redundant unless vertical sync is enabled.

Vertical Sync   Off:
//Disables FPS synchronization with monitor refresh rates.

Virtual Reality Pre-Rendered Frames   1:
//Only relevant for VR; leave it at 1 if not using VR.

Vulkan/OpenGL Method   Auto:
//Allows automatic optimization for Vulkan/OpenGL applications.
High Priority for the cs2.exe Process
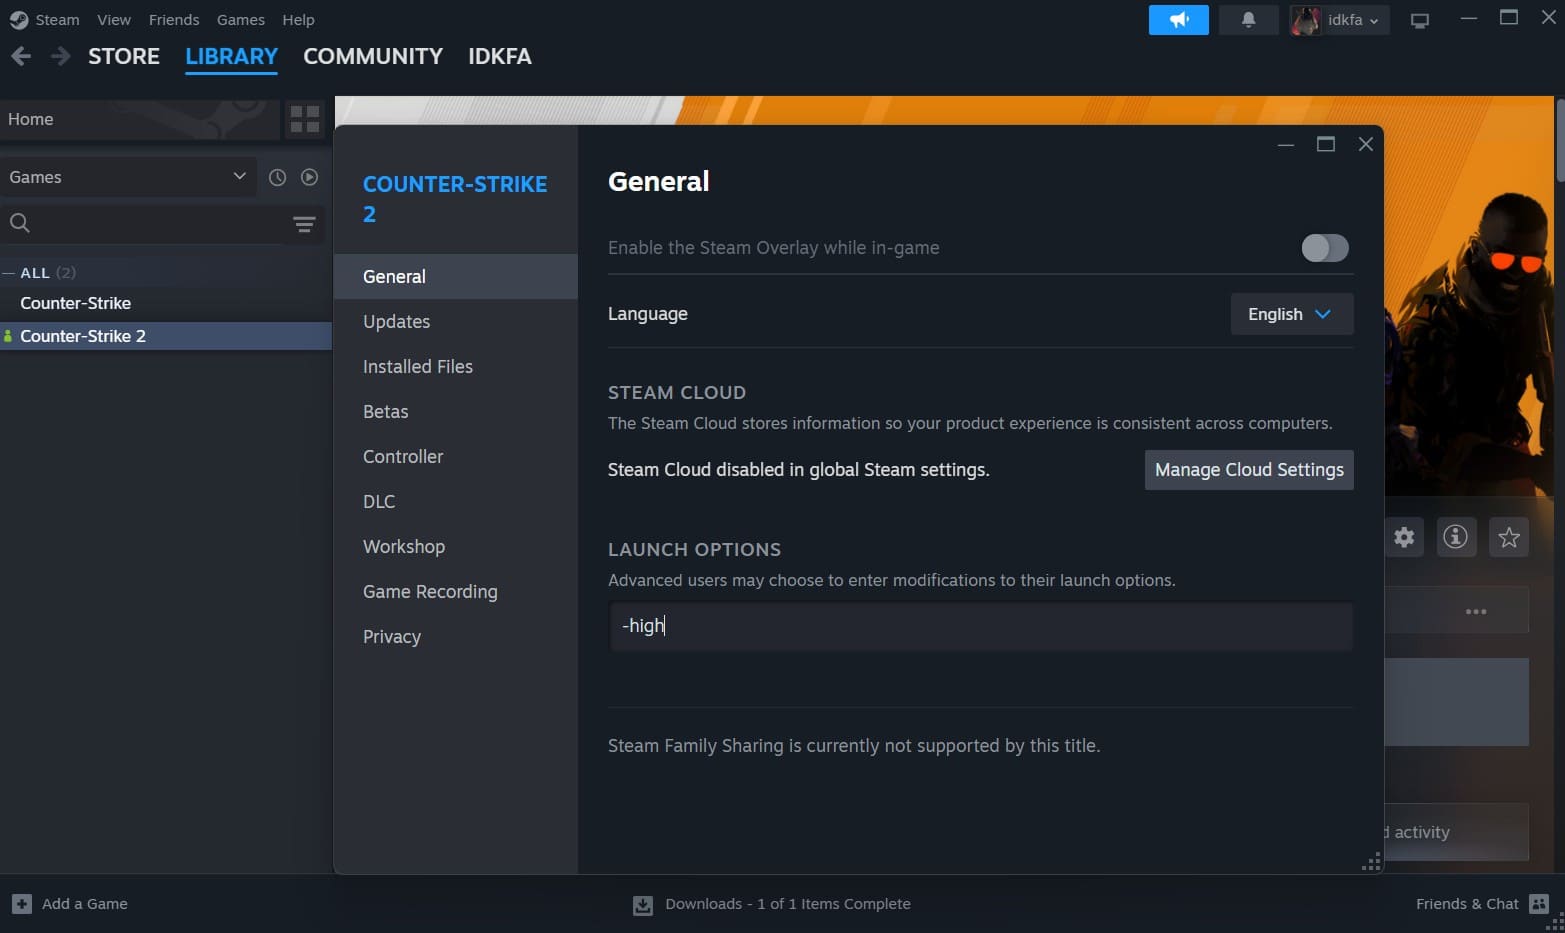
Running Counter-Strike 2 with high priority can improve performance by making the game smoother, more responsive, and stabilizing FPS. You can do this manually via Task Manager or automate it using the –high launch option in Steam’s CS2 Launch Options. Alternatively, you can configure it through the Windows OS registry. For a step-by-step guide and the differences between these methods, refer to this detailed article: [Counter Strike 2: Is the “-high” option worth it?].
In-Game Graphics Settings
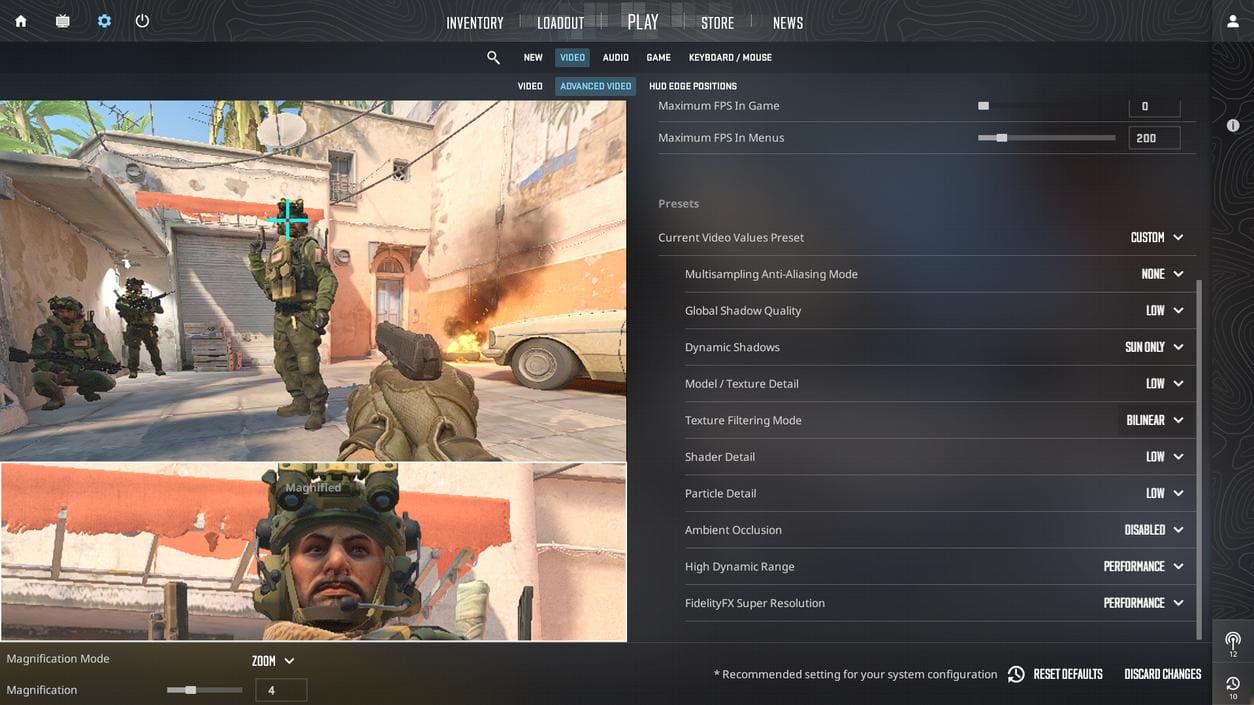
For maximum performance, most in-game settings should be set to LOW. However, certain options like Boost Player Contrast and Dynamic Shadows can be useful during gameplay. These should be tested to find what works best for you.
Boost Player Contrast: Disabled
Multisampling Anti-Aliasing Mode: None
Global Shadow Quality: Low
Dynamic Shadows: Sun Only
Model/Texture Detail: Low
Texture Filtering Mode: Bilinear
Shader Detail: Low
Particle Detail: Low
Ambient Occlusion: Disabled
High Dynamic Range (HDR): Performance
FidelityFX Super Resolution (FSR): Performance
Set Display Mode to Fullscreen for the best performance.
Important
Console Commands
Using specific console commands can provide a slight FPS boost.
					fps_max 0
//Removes the FPS cap. If you experience large FPS fluctuations, consider setting an FPS limit instead.

r_drawtracers_firstperson 0
//Disables bullet tracers in first-person view.

cl_autohelp 0
//Disables in-game hints.

cl_hide_avatar_images 1
//Turns off animations for player avatars.

cl_crosshair_friendly_warning 0
//Disables the friendly fire warning on the crosshair.
Additional Steps
The following actions may not directly increase your FPS but can help stabilize it and, in some cases, make the game feel more responsive and stable.
Launch Option: -threads
The -threads option specifies the number of CPU threads allocated to the game’s thread pool. In Counter-Strike 2, the engine automatically determines the number of threads and sets it to one less than the actual number of threads on your processor.
To check the current thread count, use the sys_info command in the game console and look for a line like:
Engine thread pool: 15 thread(s) or Engine thread pool: 3 thread(s) or Engine thread pool: 7 thread(s).
You can manually adjust this setting in the Steam launch options for CS2. For example:
If you have 8 threads, the default value will be 7. You can set it to 9 using:
-threads 9
This ensures all threads are utilized, potentially improving gameplay responsiveness. Test this setting to see how it works on your system.
Launch Option: -vulcan
The -vulkan option forces Counter-Strike 2 to use the Vulkan graphics API instead of DirectX. Vulkan provides low-level access to the GPU, which can improve performance and reduce latency, especially on AMD and NVIDIA graphics cards.
Vulkan is known to handle workloads efficiently, offering better performance in some cases compared to DirectX.
Be sure to test this option to determine if it benefits your setup.
Steam Settings Optimization
In the Steam client, go to Steam > Settings > Interface and disable the following options:
- Enable smooth scrolling in web views
- Enable GPU-accelerated rendering in web views
- Enable hardware video decoding, if supported
These changes reduce resource usage by Steam, which may positively affect game performance. Test these adjustments to see their impact.
Disable Full-Screen Optimization for cs2.exe
By default, Windows uses Full-Screen Optimization, which renders games through the Desktop Window Manager. This can introduce additional overhead and input delay. Disabling this feature is often beneficial for performance-focused games like Counter-Strike 2.
To disable Full-Screen Optimization:
Right-click on cs2.exe and select Properties.
Go to the Compatibility tab.
Check the box for Disable full-screen optimization.
Click OK and close the window.
Adjust Paging File Size
While increasing virtual memory (paging file size) was effective in older systems, Windows 10 and 11 manage virtual memory efficiently by default. Adjusting the paging file size specifically for Counter-Strike 2 is unlikely to yield noticeable performance improvements.
Youtube
Conclusion
Optimizing your FPS in Counter-Strike 2 is crucial for a competitive edge. By following these steps, you’ll enjoy smoother gameplay and reduced input lag, helping you focus on what matters most—outplaying your opponents.

