Logitech G HUB Interface Overview
The G HUB interface is built around device control, profiles, shared community presets, and general software settings. It can be used to configure mice, keyboards, headsets, webcams, RGB lighting, button assignments, DPI levels, macros, and game-specific presets.
The main G HUB window is built around four key areas: Devices, Community, Profiles, and the Gear icon for general settings. These sections are enough to understand how the software works before moving deeper into device settings and macros.
General Settings, Community, Profiles, and Devices
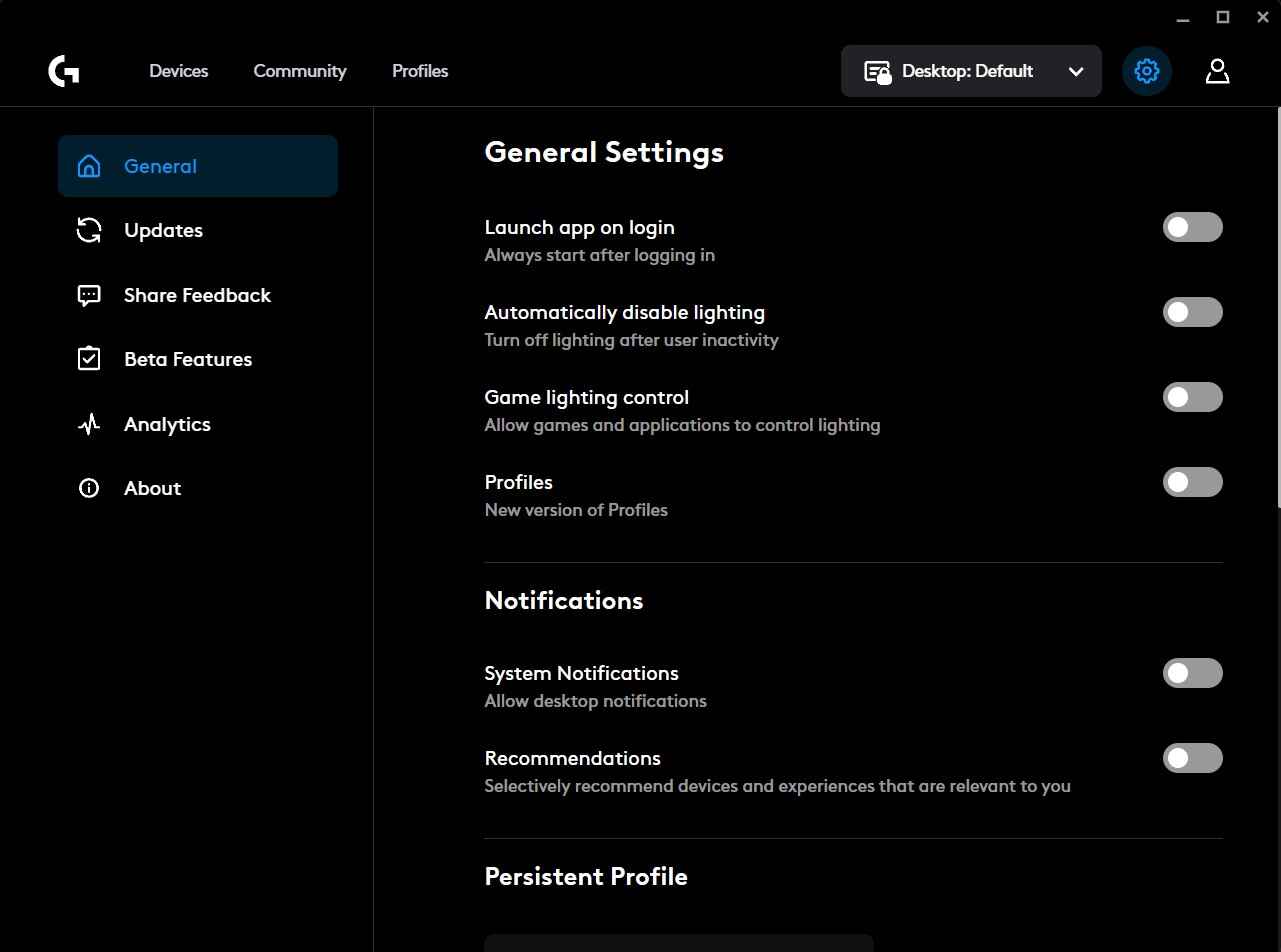
The Gear icon opens the general G HUB settings. This is where you can manage software updates, startup behavior, notifications, analytics options, persistent profiles, and other global settings that affect how G HUB runs in the background.

The Community tab is used for shared content. Players can browse and download user-made lighting effects, audio presets, device profiles, and macros. This can be useful if you want to test ready-made setups, but every downloaded profile should still be checked manually, especially if it includes macros or unusual button assignments.
The Profiles tab controls how G HUB behaves in different games and applications. You can create a global desktop profile, then separate profiles for CS2, CS 1.6, or any other game. When a selected game or program starts, G HUB can automatically switch to the matching profile. This is useful because the same mouse button can perform different actions depending on the active profile. For example, a side mouse button can work as "Back" in Windows, as a custom bind in CS2, and as a different command in CS 1.6.

The Profiles tab also includes Scripting, where more advanced Logitech setups can use Lua scripts. Unlike simple macros, Lua scripts are written in a real programming language and can create much more complex behavior.

The Devices tab shows your connected Logitech G mice, keyboards, headsets, and other supported devices. This is where the main device configuration happens. For a mouse, this usually includes sensitivity, DPI levels, button assignments, macros, and lighting. For a keyboard, it can include key assignments, lighting zones, game mode behavior, and macro keys.
Devices and On-board Memory

Many Logitech G devices also support On-board Memory. This allows some settings to be saved directly into the device, so they can work without G HUB constantly controlling them in the background. However, this mainly applies to simpler settings such as DPI levels, basic button assignments, and lighting profiles. More advanced macros, software-based actions, and Lua scripts usually require G HUB to be running.
Logitech G HUB Device Settings
After the main G HUB interface, the next part is the device settings. For this guide, the most important devices are the mouse and keyboard. Let’s start with the mouse, where G HUB usually shows three main tabs: Sensitivity (DPI), Assignments, and LIGHTSYNC.
Sensitivity (DPI) Tab
The Sensitivity (DPI) tab is used to configure mouse sensitivity levels. Here you can set the DPI values used by the mouse and choose how many sensitivity stages you want to keep.

By default, the Logitech G502 mouse uses four DPI levels: 1200, 2400, 3200, and 6400. These values are not fixed. You can change them, remove existing DPI stages, or add new ones depending on how you want the mouse to behave in games, Windows, or other applications.
LIGHTSYNC Tab
The LIGHTSYNC tab controls mouse lighting. On the G502, it includes two lighting zones: Primary and Logo.

The Primary section controls the main lighting profile, while Logo controls the illuminated Logitech G logo. For both zones, you can choose a color from the RGB palette and select an effect. This allows you to keep a static color, use animated lighting, or match the mouse lighting with the rest of your Logitech G setup.
Assignments Tab
The Assignments tab is used for buttons and actions. This is where you assign commands to mouse buttons or keyboard keys, depending on the selected device and active profile.

G HUB separates assignments into several categories:
- Commands - system-style commands usually triggered by common shortcuts, such as copy, paste, undo, and similar actions.
- Keys - assigns a keyboard key to a mouse button. For example, a mouse button can act like a specific keyboard key when pressed.
- Actions - assigns actions from a supported application or game profile.
- Macros - used to record, create, and assign macros.
- System - contains device-related and system-level functions, including button swapping, mouse functions, and other control options.
After a macro is created, drag it from the Macros list and drop it onto the button you want to use. The selected mouse button will trigger the macro.
Keyboard Assignments

Keyboard setup in G HUB works in almost the same way as mouse setup. The main difference is where the macro can be assigned. On many Logitech G keyboards, macros can be assigned to the F1-F12 keys, giving you up to twelve macro slots directly on the keyboard.
Keyboard macros are useful when you do not want to overload mouse buttons, or when a macro is easier to trigger from the keyboard.
How Logitech G HUB Macros Work
Macros in Logitech G HUB allow you to record or manually build a sequence of actions: keyboard presses, mouse clicks, delays, holds, releases, and repeated inputs. In Counter-Strike, a macro can be understood as a higher-level automation layer above a normal bind or an in-game alias.
A basic structure looks like this:
- Bind - performs one action, command, or activation.
- Script / Alias - performs a chain of in-game commands.
- Macro - performs a chain of physical inputs with timing, delays, and a selected playback mode.
Logitech G HUB supports four main macro types:
- No Repeat - the macro runs once after pressing the assigned button.
- Repeat While Holding - the macro keeps running while the assigned button is he
- Toggle - one press starts the macro, and the next press stops it.
- Sequence - a more advanced mode where different parts of the macro can run on press, while holding, and on release.
How to Create and Assign a Macro in G HUB
To create a macro in Logitech G HUB, open the selected device, go to Assignments, choose Macros, and click Create New Macro.

After that, select the macro type, click Start Now. G HUB will open a menu with several macro action types:
- Record Keystroke - records a normal sequence of keyboard or mouse inputs, including scroll actions.
- Text & Emojis - creates a custom text or emoji input that can be inserted into a selected field with one button press.
- Action - assigns a supported action for a compatible game or application.
- Launch Application - starts a selected program or game.
- System - assigns one or more system-level actions.
- Delay - adds custom timing that can be placed between macro actions.
Choose a type, add the required inputs or delays, and save the macro.
Then the macro is created, drag it from the Macros list and drop it onto the mouse button or keyboard key you want to use. Make sure the correct G HUB profile is active, because macro assignments are profile-based.
CS2 Macro Examples for Logitech G HUB
The examples below are shown for educational testing and macro editor understanding only. I do not recommend using gameplay automation in CS2 Competitive or Premier modes.
Below are several Counter-Strike 2 macro examples created with Logitech G HUB input-and-delay logic. These examples show how timing, button presses, releases, and repeat modes can be combined inside one macro.
In G HUB, HyperX NGENUITY, Bloody Esports, Razer Synapse, and many similar programs, a simple macro usually follows this structure:
first input press -> X ms -> first input release -> X ms -> second input press -> etcHowever, G HUB can also control more than one input at the same time. This is important for macros where two or more buttons must overlap for a short moment. For example, a Jump Throw macro needs to pull the pin with +attack and almost immediately trigger +jump. In this case, the macro controls two inputs, and the structure looks more like this:
first input press -> X ms -> second input press -> X ms -> first input release -> X ms -> second input releaseMacro notation used below:
- LMB - left mouse button
- RMB - right mouse button
- MouseX - extra mouse button
- Space, H, or any other key - keyboard key
- X ms - delay in milliseconds
CS2 Jump Throw Macro

The classic jump-throw bind was limited by the cl_allow_multi_input_binds cvar introduction on August 19, 2024. I already have a separate guide for the usual alias-based Jump Throw script, including a version that works around this limitation, but a mouse macro can perform extremely well because of precise timing.
With the right timing, a jump-throw macro can make grenade throws much more consistent. You aim, press one button, and the macro handles the jump and release sequence. With running before the throw, it can also throw utility over long distances each time with high accuracy.
The macro type is No Repeat, the sequence is:
LMB press -> 55 ms -> Space press -> 107 ms -> LMB release -> 50 ms -> Space releaseCS2 AK-47 Burst 3 Macro

The AK-47 Burst3 macro is a simple shooting macro that holds the left mouse button long enough to fire a short burst (3 bullets) instead of a full spray. It is designed for short controlled bursts, where the player wants several shots without fully committing to continuous fire.
The macro type is No Repeat, the sequence is:
LMB press -> 179 ms -> LMB release -> 3 msThe short 3 ms break helps separate bursts and gives better control when repeating the macro several times.
CS2 AK-47 Single Shot Macro

The AK-47 Burst One macro is built for controlled single-shot rhythm while the button is held. Instead of manually clicking every shot, the macro creates a repeated firing pattern with short press timing and longer recovery delays between shots.
The macro type is Repeat While Holding, the sequence is:
LMB press -> 17 ms -> LMB release -> 175 ms -> LMB press -> 17 ms -> LMB release -> 190 msCS2 Bunny Hop Macro

The Bunny macro imitates repeated Space presses with a fixed delay. Instead of enabling commands like sv_cheats 1 and sv_enablebunnyhopping 1, this macro creates its own jump cycle through mouse or keyboard input.
The macro type is Toggle, the sequence is:
Space press -> 54 ms -> Space release
You are not locked to the timing used by sv_enablebunnyhopping. The delay can be adjusted manually until the jump rhythm feels comfortable for your movement style.
CS2 Scout Fast Scope Macro
The Scout Fast Scope macro is based on a quick right-click and left-click sequence. It quickly activates zoom, fires, and releases the input with very short delays between each action.

The first zoom level may appear only for a very short moment, but the shot is still fired during that scoped timing window. This makes the shot more accurate than a pure no-scope, even if the zoom animation is barely visible.
The macro type is No repeat, the sequence is:
RMB press -> 22 ms -> RMB release -> 35 ms -> LMB press -> 33 ms -> LMB releaseCS2 TEC-9 Macro

The Tec-9 Click Repeat macro imitates repeated left mouse button presses with selected delays between shots. Instead of clicking manually as fast as possible, the macro creates a steadier shooting rhythm that is easier to control.
This can make the Tec-9 feel much closer to an automatic weapon in short fights. It can be especially useful for players who have trouble clicking quickly while keeping the crosshair stable on the target.
With the right rhythm, the TEC-9 becomes a very dangerous eco-round weapon.
The macro type is Repeat While Holding, the sequence is:
LMB press -> 55 ms -> LMB release -> 75 msOther CS2 Macro Ideas for Logitech G HUB
Other macros can be built with the same input-and-delay logic.
For the Desert Eagle, repeated shots can be slowed down slightly. This helps reduce spam-clicking and gives the weapon more time to recover accuracy between shots.
The same approach can be tested with the AUG and SG 553. A slightly slower firing rhythm can make short bursts tighter and easier to control.
Another possible example is a defuse + smoke macro. The player starts defusing with the Use key, and the macro quickly throws a smoke under the player to cover the defuse position.
Logitech G HUB Macro FAQ

What is Logitech G HUB used for?
Logitech G HUB is used to configure Logitech G gaming devices, including mice, keyboards, headsets, webcams, mousepads, profiles, DPI levels, LIGHTSYNC RGB, button assignments, macros, and Lua scripts on supported devices.
Can Logitech G HUB create macros?
Yes, Logitech G HUB can record or manually create macros with clicks, keystrokes, delays, holds, releases, and different playback modes. After creating a macro, you can assign it to a mouse button or keyboard key.
What macro types are available in Logitech G HUB?
G HUB supports several macro playback types: No Repeat, Repeat While Holding, Toggle, and Sequence.
Can Logitech G HUB macros be used in games?
Yes, but they should be used carefully. Different games, servers, leagues, and platforms may treat input automation differently, especially if a macro affects shooting, movement, or repeated actions.