Razer Synapse 4 Interface and Main Tabs
Like Logitech G HUB, HyperX NGENUITY, Bloody Esports Software, and other gaming peripheral tools, Razer Synapse 4 is built around separate sections for different tasks. It divides device settings, macros, linked games, app settings, and lighting effects control into different tabs.

Device settings stay inside Synapse, while advanced RGB control is handled through the separate Chroma App. Synapse 4 is divided into five main areas:
- Synapse - main dashboard, connected devices, modules, online services, Gamer Room, and global shortcuts.
- Macro - creation and editing of macros, including delays, keyboard actions, mouse actions, loops, text input, and assigning macros to device buttons.
- Settings - Synapse startup behavior, notifications, recommendations, profile migration, language, updates, and program version information.
- Linked Games - linking games or programs to specific Razer device profiles for automatic profile switching.
- Devices tab - direct settings for your connected Razer device, such as button assignments, DPI, polling rate, lighting, and calibration.

Synapse is the general dashboard and module area. Macro is for creating and editing macro sequences. Settings controls the behavior of the Synapse app itself. Linked Games connects games and programs to device profiles. The device tab opens the real hardware settings for your connected Razer mouse, keyboard, or other supported device.
Synapse Tab: Dashboard, Modules, and Shortcuts
The Synapse tab is the main hub of Razer Synapse. It does not focus on one specific mouse or keyboard. Instead, it gives access to the general dashboard, connected devices, installed modules, online services, shortcuts, and extra Razer ecosystem features.
Inside the Synapse tab, there are four main sections:
- Dashboard - the main start page with connected devices, modules, and online services.
- Gamer Room - room lighting section for Razer Aether lights and Chroma-connected smart lighting devices.
- Devices & Modules - shows installed devices/modules, recent updates, and optional modules available for installation.
- Global Shortcuts - lets you create hotkeys for actions that work across Synapse profiles.
Dashboard Section
The Dashboard section is the main landing page in Razer Synapse 4. It gives a quick overview of the Synapse environment and shows the main blocks available inside the app.
At the top of the Dashboard, Synapse shows a large banner (may be disabled) about Razer Synapse 4 and the Chroma App. This banner explains that device configuration and advanced RGB lighting are now separated: Synapse handles device setup, while Chroma App handles more advanced lighting effects.
Below the banner, the Dashboard has three collapsible sections: Devices, Modules and Online Services.
The Devices section shows the Razer hardware currently detected by Synapse. If a mouse, keyboard, headset, controller, or other supported device is connected, it appears here as a device card. Clicking the device opens its dedicated settings page.
The Modules section contains extra Synapse features that can be opened or installed.
- Add WiFi Device
- Linked Games
- Synapse 3 Profile Migration
- Feedback
Each module adds a specific function to Synapse.
The Online Services section is not used for device configuration. It is more like a shortcut area for Razer’s online ecosystem. It includes:
- Razer.com - official Razer store and product pages.
- Razer Gold & Silver - Razer’s gaming and entertainment credit system.
- Razer Community - Razer community content, news, and discussions.
- Razer Support - help center for devices, software, warranty, troubleshooting, and drivers.
For most users, this section can be ignored during normal setup. It does not change DPI, macros, profiles, or lighting. It only provides quick access to external Razer services.
Gamer Room Section
Gamer Room is a visual section focused on Razer Aether lights and room-based RGB setups. It is designed for users who want to control smart lighting around their gaming room, such as light bulbs, light strips, lamps, and ambient RGB devices.

This section also includes two lower areas: Synapse Override shows devices that can be controlled through Synapse Override and Controlled by Gamer Room App shows devices managed remotely through the Razer Gamer Room app.
Devices & Modules Section
Devices & Modules is the maintenance area for Synapse components.

This screen is useful when you want to check what Synapse has installed, what was recently updated, and which optional modules are available. It is not a gameplay configuration page. It is more like Synapse’s internal app/module manager.
Global Shortcuts Section
Global Shortcuts lets you create custom hotkeys that work across Razer Synapse profiles.

In this section, you can add shortcuts for profile switching, including cycling through profiles, moving to the next or previous profile, or activating a specific profile directly.
MACRO Tab: Recording, Editing, and Key Binds
The Macro tab is where Synapse handles macro creation, recording, editing, and assignment. This section has two main parts, My Macros and Key Binds.
My Macros section
My Macros section is the main macro editor. At the top left, you can choose the current macro from a dropdown list or create new.

Available action types include:
- Delay - adds a pause between actions. Delays are important because macros without proper timing may run too fast and fail to register.
- Keyboard Function - adds a keyboard key press, release, or key combination.
- Mouse Function - adds mouse actions such as clicks, scroll actions, or mouse button functions.
- Macro - inserts another macro into the current macro. This can be useful for building longer sequences from smaller reusable parts.
- Launch - launches an application, just a file or game.
- Run Command - runs a system command.
- Text Function - types or inserts text.
- Loop - repeats a selected part of the macro.
Key Binds section

Key Binds is where created macros can be assigned to device buttons or keys. The macro itself is built in My Macros, but it does nothing until assigned somewhere. Key Binds connects the macro to a physical input, such as a side mouse button or keyboard key.
Settings Tab: Startup, Updates, and Profile Migration
The Settings tab controls the behavior of Synapse itself. It has two main sections: Synapse and General.
Synapse Section

- The Auto-Launch block controls startup behavior. If Start Razer Synapse automatically when system starts is enabled, Synapse launches with Windows. The option Minimize to system tray on startup makes it start quietly in the background.
- The Notifications block controls on-screen notifications.
- The Recommendations block controls what Synapse shows on the Dashboard.
- Tutorials Reset allows the user to reset tutorial pop-ups. After resetting, Synapse will show its tutorial guidance again.
- Profile Migration launches the migration tool for moving profiles, macros, and Chroma effects from Synapse 3 to Synapse 4. This is important for users upgrading from the older Synapse version.
- Device Lighting lets the user choose how lighting is controlled. The options are Chroma RGB and Dynamic Lighting. If Chroma RGB is selected, Synapse controls supported device lighting through Razer’s own RGB system. Synapse also recommends disabling Windows Dynamic Lighting to avoid conflicts.
General Section

Here you can change the interface language, check What’s New for recent updates and release notes, and in the About section you can see the current Razer Synapse version and related program information.
Linked Games Tab
The Linked Games tab connects games or programs to device profiles.
This is a useful section for gamers because it allows automatic profile switching. Instead of manually changing mouse settings every time you launch a game, you can link the game to a specific profile. The tab has two sections: Games and Devices.
Games Section
This section shows added games and programs. If no games are added, the screen displays a large tile: Add a game/program or drag and drop here.
For CS2, this means selecting cs2.exe from the game folder. After the game is added, it can be linked to a specific Razer device profile. This is useful because CS2 can have its own DPI setup, button layout, macros, lighting, and calibration choices. The desktop can use one profile, CS2 another, and other games their own profiles.
Devices Section
This section shows Razer devices that can be linked to games. Inside Linked Games to Razer Basilisk V3 for example, the user can manage profile-game links for that mouse. There is a profile dropdown, a tile for adding a game/program, filters for views and sorting, and a three-dot menu.
Device Tab: Razer Basilisk V3 Mouse Settings
The Device tab is the device-specific control panel for the connected devices. In this case the mouse Basilisk V3. It contains four main sections: Customize, Performance, Lighting and Calibration.
Customize Section
The Customize section is where you remap the mouse buttons. A side button can become a keyboard key, macro, media control, profile switch, DPI control, launch command, or another supported function. You can also switch between two button layers: Standard and Hypershift.

Standard is the normal button layout. Hypershift is a second layer of button assignments. When the assigned Hypershift key is held, other buttons can perform different actions. This gives the mouse more commands without adding extra physical buttons.
This section also includes Scroll Wheel settings. The Scrolling Mode option lets you choose between Tactile and Free-Spin. Tactile gives you a controlled, notched scroll while Free-Spin allows the wheel to spin faster and more smoothly.
The Smart-Reel option automatically switches the wheel into Free-Spin when you flick it quickly, then returns it to Tactile mode when scrolling stops.
Performance Section
Performance controls DPI, sensitivity stages, polling rate, and access to Windows mouse properties. The main block is Sensitivity. DPI defines how far the cursor moves in response to physical mouse movement.
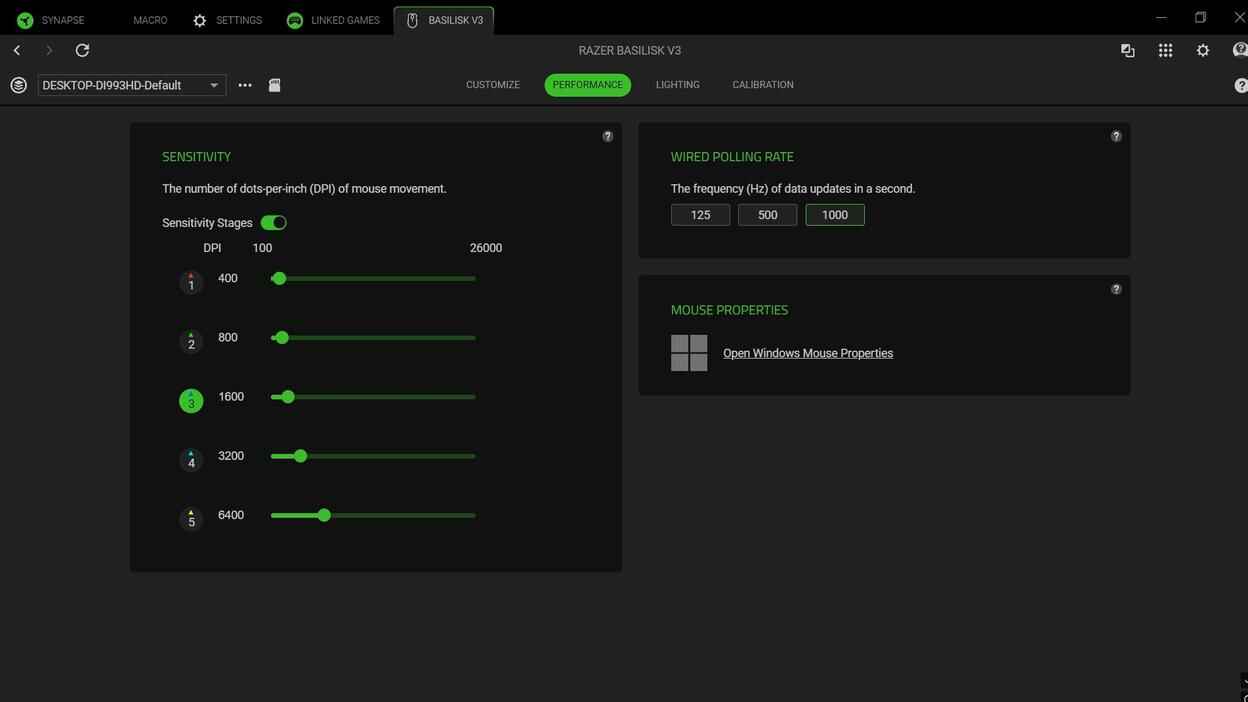
By default, Synapse shows five DPI stages:
- Stage 1 -> 400 DPI
- Stage 2 -> 800 DPI
- Stage 3 -> 1600 DPI
- Stage 4 -> 3200 DPI
- Stage 5 -> 6400 DPI
The default stage is 1600 DPI. The available DPI range is from 100 to 26000.
The Wired Polling Rate block controls how often the mouse sends movement data to the PC. Available values are:125 Hz, 500 Hz, and 1000 Hz default. For gaming, 1000 Hz is usually the preferred setting because the mouse reports input more frequently. This makes movement feel smoother and more responsive.
The Mouse Properties block opens the standard Windows mouse settings.
Lighting Section
Lighting controls the RGB behavior of the Basilisk V3. Here are three blocks Brightness, Switch Off Lighting and Effects.

The Brightness block lets you enable or disable lighting and set brightness from 0 to 100. In this setup, the brightness is set to 70..
The Switch Off Lighting block controls when the mouse lighting turns off automatically. You can turn it off when the display is turned off, or after the mouse has been idle for a selected number of minutes.
The Effects block on the right side offers ready-made lighting presets. All Effects are easy to use and can be saved directly to a device profile.
There is also Advanced Effects. When selected, Synapse prompts the user to install Razer Chroma App. Advanced lighting is no longer handled only inside basic Synapse. It uses the Chroma App for deeper RGB control.
Calibration Section

Calibration controls how the Basilisk V3 sensor behaves on different surfaces. Synapse says the mouse already tracks accurately out of the box, but calibration can improve precision on specific mousepads or surfaces. There are two modes here: Smart Tracking and Manual Calibration.
CS2 Macro Examples for Synapse 4
Macros are sequences of actions, such as mouse clicks, delays, key presses, commands, and file launches, that are triggered by pressing or holding a specific button. They can be created manually or recorded automatically.
Unlike most similar tools, such as Logitech G HUB, HyperX NGENUITY, or Bloody Esports, Synapse 4 displays macro actions vertically instead of horizontally. It also shows how actions are connected, making the macro logic easier to read and edit.

Razer Synapse 4 supports the following macro playback types:
- Play once - the macro runs once after the assigned button is pressed.
- Play multiple times - the macro repeats a set number of times.
- Toggle continuous playback on/off using assigned key - one press starts the macro, and the next press stops it.
- Play while assigned key is pressed - the macro keeps running while the assigned button is held down.
- Queue - Synapse 4 supports macro queuing, allowing multiple actions or macros to run in sequence. This makes it possible to build more advanced macro logic, including click delays and chained actions.
How Profiles Work in Razer Synapse 4
Synapse 4 profiles are separate sets of button assignments, performance settings, lighting options, and macro bindings. You can create different profiles for desktop use, CS2, testing, or any other task.
These profiles can be switched manually at any time. This is different from Linked Games, where Synapse tries to load a profile automatically when a specific game or program starts.
Manual profile switching is useful when you want full control. Linked Games is useful when you want Synapse to change profiles automatically.
In Synapse 4, profiles can be switched in five ways:
- Button to Next Profile
- Button to Previous Profile
- Button to Cycle Up Profile
- Button to Cycle Down Profile
- Button to Specific Profile

Hypershift can also help here because it gives you additional button layers for profile switching and other actions
How to Create a Macro in Razer Synapse 4

Follow these steps to create a macro:
- Open Synapse 4 and go to the MACRO tab.
- Click RECORD to record mouse clicks and/or keyboard inputs and click STOP when you finish recording the actions.
- Use the editor to edit or delete recorded actions. Usually, the first and last delay are not needed.
- Use the right-side panel to add extra actions if needed.
- Optionally, rename the macro for easier management. Click the three dots next to the macro name, then choose Rename.
- Click SAVE to save the recorded macro.

How to Assign a Macro to a Button
- Go to the Device tab and click the button you want to customize, for example Right Click.
- In the right-side menu, select Macro, choose the macro you want to assign and select its playback type.
- Click SAVE to apply the assignment.

To restore the original function of the button, click the same button again, select Default at the top, and then click SAVE.
How to Assign a Macro File to a Button
Synapse 4 can import macro files in .xml format. You can assign an imported macro file this way:
- Go to the Device tab and in the upper-left area, select the profile name.
- Click the three horizontal dots next to it, choose Import and pick the .xml macro file.
- Click the button you want to customize.
- In the right-side menu, select Macro, choose the imported .xml macro and its type, and click SAVE.
Now you only need to test how the assigned button behaves.
To access the Left Mouse Button (Left Click), you first need to move the left-click function to another button, for example Scroll Click.
CS2 Macro Examples for Razer Synapse 4
The examples below are shown for educational testing and macro editor understanding only. I do not recommend using gameplay automation in CS2 Competitive or Premier modes.
Below are several Counter-Strike 2 macro examples created for Synapse 4. They show how delays, button presses, button releases, and playback modes can be combined inside a single macro.
CS2 Bunny Hop Macro
This macro simulates repeated Space key presses with a fixed delay. Instead of using commands such as sv_cheats 1 and sv_enablebunnyhopping 1, it creates its own jump cycle through direct mouse input signals.
Playback Option - Toggle continuous playback on/off using assigned key.

CS2 Quick Scope Macro
This macro uses a fast sequence of right-click and left-click actions. It is not a true no-scope shot because the scope is still activated. The zoom appears only for a brief moment during the Scout shot, and the bullet lands much closer to the point where the scope was aimed, instead of following the random spread typical of shooting without aiming.

Playback Option - Play Once.
CS2 Burst Fire Macro
This is a simple shooting macro that holds the left mouse button just long enough to fire a short burst, usually 2-3 bullets, instead of a continuous spray. It is designed for quick, controlled bursts at medium and long range.

Playback Option - Play Once.
CS2 Single-Shot Cycle Macro
The Single-Shot macro creates a controlled rhythm of single shots while the assigned button is held down. The shooting behavior feels similar to SCAR-20 or G3SG1 tap firing, but faster and more consistent.

Playback Option - Play while assigned key is pressed.
CS2 Tec-9 Burst Macro
This macro simulates repeated left-click presses with fixed intervals between shots. Instead of clicking manually as fast as possible, the macro creates a more consistent shooting rhythm that is easier to control.

Playback Option - Play while assigned key is pressed.
CS2 Jump Throw Macro
The classic Jump Throw bind, or more accurately the classic Jump Throw script, stopped working after Valve introduced the cl_allow_multi_input_binds 1 restriction in the August 19, 2024 patch.
With proper timing, a Jump Throw mouse macro can make grenade throws most accurate and consistent.

Playback Option - Play Once.
Razer Synapse 4 Macro FAQ

Does Razer Synapse 4 support macros?
Yes, Razer Synapse 4 includes a full Macro tab where you can record actions, add delays, edit key presses, insert mouse actions, import macro files, and assign macros to supported Razer devices.
Can I assign a macro to any mouse button?
Most programmable buttons can be reassigned to a macro. Some primary buttons may be locked until their original function is moved to another button first.
What macro playback modes are available in Synapse 4?
Synapse 4 supports several playback modes, including Play Once, Play Multiple Times, Toggle Continuous Playback, Play While Assigned Key Is Pressed, and Queue.
Can I use different macros for different games?
Yes. You can create separate profiles for different games or tasks, then assign different macros, DPI stages, lighting, and button layouts to each profile. Linked Games can also switch profiles automatically when a game starts.
Are CS2 macros safe to use in Competitive or Premier?
I do not recommend using gameplay automation macros in CS2 Competitive or Premier modes.