Jump Throw Script in 2025 – Complete Guide
In the ever-evolving world of Counter-Strike 2, precision and timing are everything — especially when it comes to utility usage. With Valve’s crackdown on traditional scripting methods in 2024, players have been left wondering if the beloved jump throw script is a thing of the past. But as with any good tactical shooter, where there’s a wall, there’s a boost. In this guide, I’ll break down exactly how to execute a legal jump throw in CS2 in 2025, using a clever workaround that operates within the latest input system restrictions. No macros, no cheats, just pure logic.
What is a Jump Throw in CS2?
A Jump Throw is a technique in Counter-Strike where a player jumps and throws a grenade at the same time. This allows for consistent, long-range grenade lineups — especially useful for smokes and molotovs that need to land in precise locations. It’s essential for executing well-timed team strategies or solo utility throws from specific spots on the map.
History of Changes in CS2
The "wait" Console Command
The wait command, once widely used in Counter-Strike 1.6 for delaying commands, was officially disabled in August 2012 shortly after CS:GO launched. Players previously used wait to time jump throws, burst fire, bunny hops, and more.
Although still available in CS 1.6, the command has been completely disabled in CS:GO and CS2, even on cheat-enabled servers (sv_cheats 1).

The "cl_allow_multi_input_binds" Console Command
On August 19, 2024, Valve introduced a new setting:
cl_allow_multi_input_binds 0
This command blocks multiple action inputs (like +jump; +attack) in a single bind. The goal was to eliminate jump throw scripts, tap-strafes, and other macro-like behaviors in matchmaking.
On official servers, this setting is locked to 0, meaning scripts combining movement and action commands won’t work.
The Classic Jump Throw Script – How It Used to Work
Before these restrictions, a classic jump throw script looked like this:
					alias "+at" "+attack"        //2
alias "-at" "-attack"        //3
alias "+jt" "+jump; +at"     //1
alias "-jt" "-jump"          //4
bind "mouse5" "+jt; -at"
Execution:
- Pressing mouse5 runs +jump and +attack
- Releasing the key ends the actions -attack (throw), -jump
- //1, 2, 3, 4 – I showed execution order as a comments
Why this no longer works:
With cl_allow_multi_input_binds 0, combining +jump and +attack in the same bind is blocked. So the above script and scripts with the same logic will fail on official servers.
The New Jump Throw Script – 2025 Bypass
Here’s the workaround – a script that cleverly uses mouse movement bindings to simulate a delayed action without triggering Valve’s restrictions.
					alias rst_mouse_y "bind mouse_y pitch"		 //3
alias at "+attack; bind mouse_y rst_mouse_y" //2
alias rst_mouse_x "bind mouse_x yaw"		 //6
alias rst "rst_mouse_x; -jump"				 //5
alias +jt "+jump; bind mouse_y at"			 //1
alias -jt "-attack; bind mouse_x rst"		 //4
bind v +jt
How This Script Works – Explained in Detail
Let’s break it down:
On key press +jt:
+jump starts and mouse_y is bound to at, which triggers if the mouse moves.
Moving your mouse vertically triggers:
+attack and bind mouse_y pitch
The grenade pin is pulled, and vertical control is restored.
On key release -jt:
-attack ends and throws the grenade. And mouse_x is bound to rst, which triggers on horizontal movement.
Which then runs:
bind mouse_x yaw and -jump
Your jump ends, and horizontal mouse control is restored.
The Bind Trick
The magic here is that re-binding a mouse axis (like mouse_x or mouse_y) immediately runs the assigned alias if the mouse is already moving.
This method does:
- Avoids using wait
- Avoids combining inputs
- Bypasses Valve’s restrictions legally
Important Notes
- This script depends on mouse movement. If you don’t move your mouse, +attack or -jump may be delayed.
- It works on official matchmaking servers since no multi-action binds are used.
- If you press the script key multiple times too quickly, +attack might get stuck. This can cause your mouse1 (primary fire) to stop working. To fix it, type -attack in the console.
- While it takes a moment to practice, once you’re familiar with it, it’s simple and reliable.
How to Run Your Scripts in Counter-Strike 2
Scripts can be written and executed manually via the in-game developer console, but this method isn’t always convenient. A better approach is to store your scripts in a configuration file (.cfg) which can be run manually—or automatically every time the game starts.
Let’s walk through the different ways you can create and load configuration files that include your scripts, keybindings, and other commands.
Create the .cfg file
- Locate your CS2 config folder:
..\steamapps\common\Counter-Strike Global Offensive\game\csgo\cfg\ - Create a new text file in that folder. You can name it using letters, numbers, dashes, or underscores.
Example: my123.txt - Change the file extension from .txt to .cfg
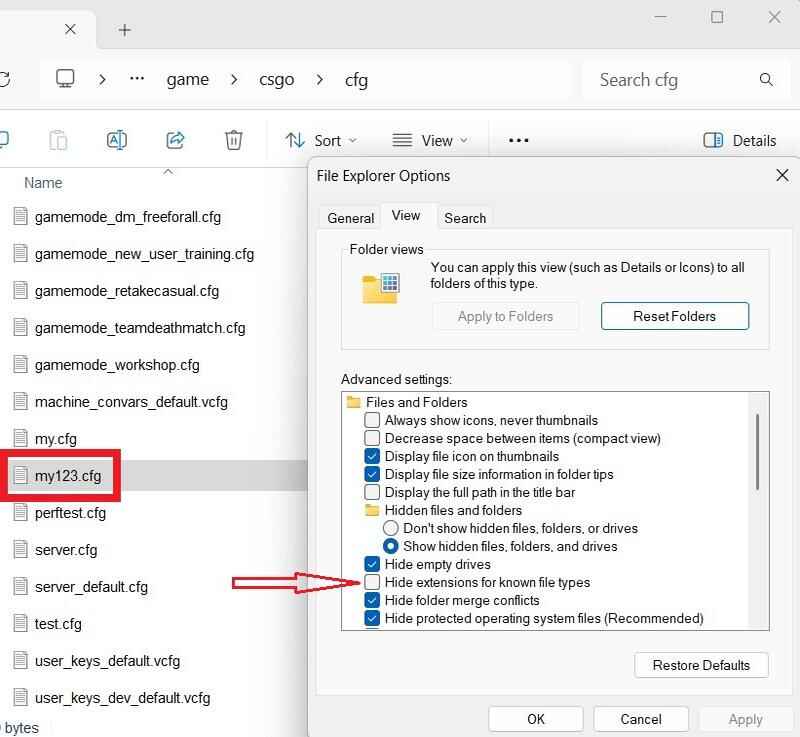
To show file extensions in Windows:
Open Control Panel → File Explorer Options → View tab, and uncheck “Hide extensions for known file types” box.
- Your final file might look like:
my123.cfg - Open the .cfg files using any text editor (like Notepad) and add your desired script(s).
- Once saved, the file can be executed using one of the methods below.
Method 1: Run via Console (Manual)
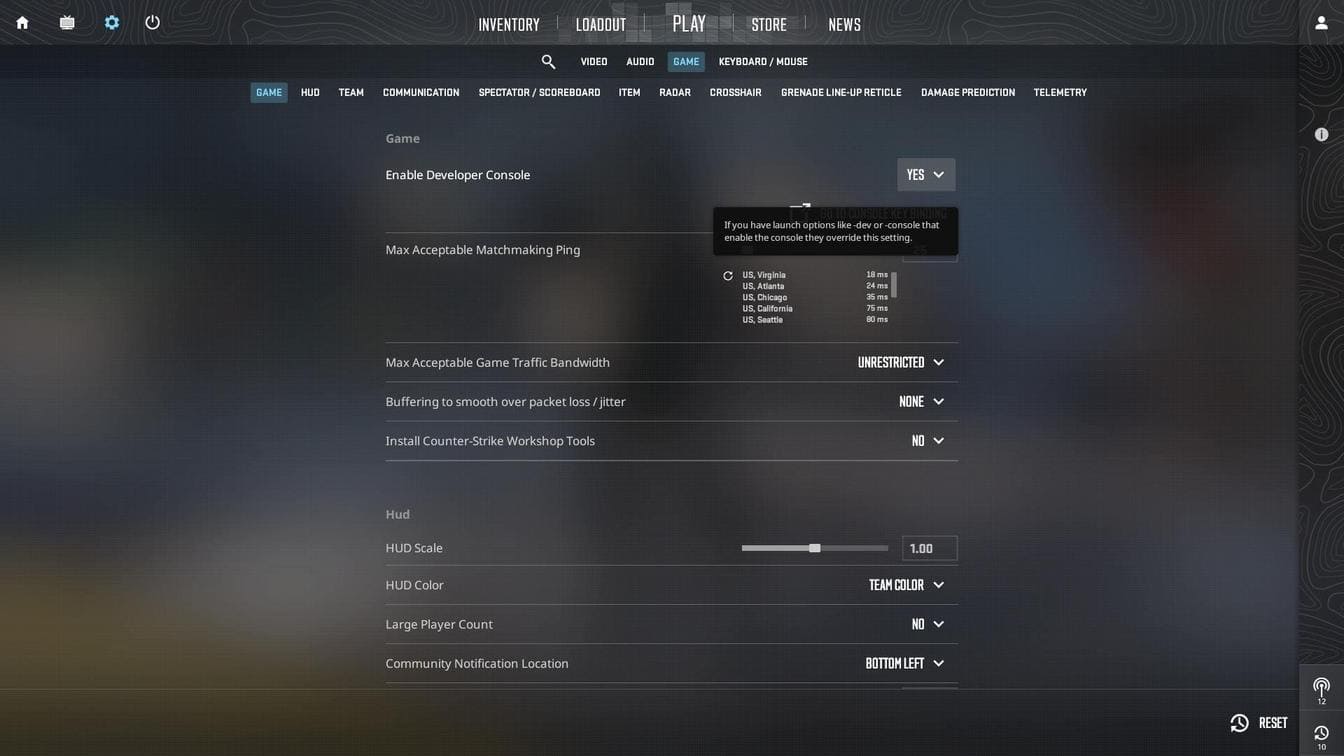
- Launch Counter-Strike 2
- Go to Settings > Game and set “Enable Developer Console” to “Yes“.
- Press the ~ key (default) to open the console
- Type the following:
exec my123 - Press Enter, then close the console (~ again) and test your script(s) in-game.
Method 2: Add to Launch Options (Auto)
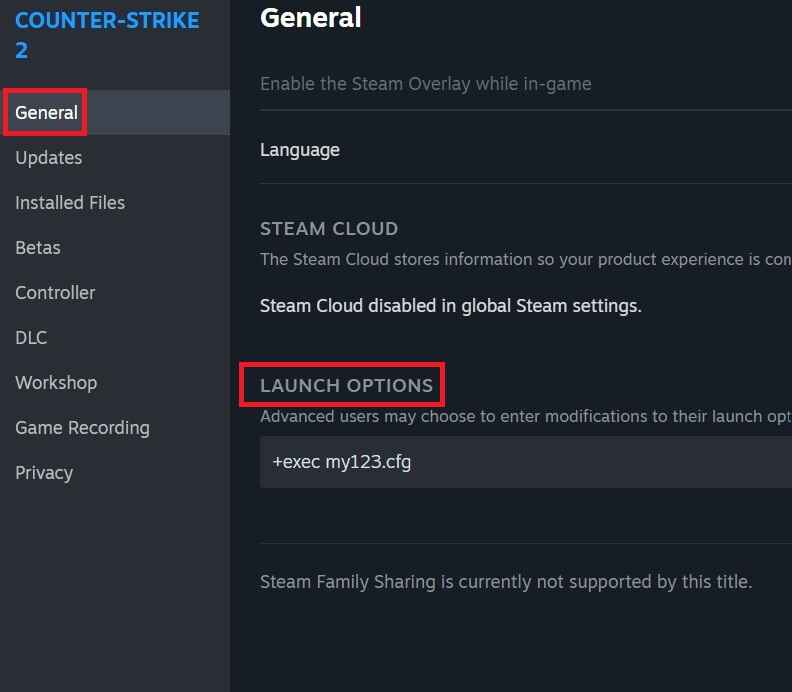
- Open Steam, right-click on Counter-Strike 2, and choose Properties.
- Under the General tab, find Launch Options.
Add the following line:
+exec my123.cfg
This will execute your script(s) automatically every time the game launches.
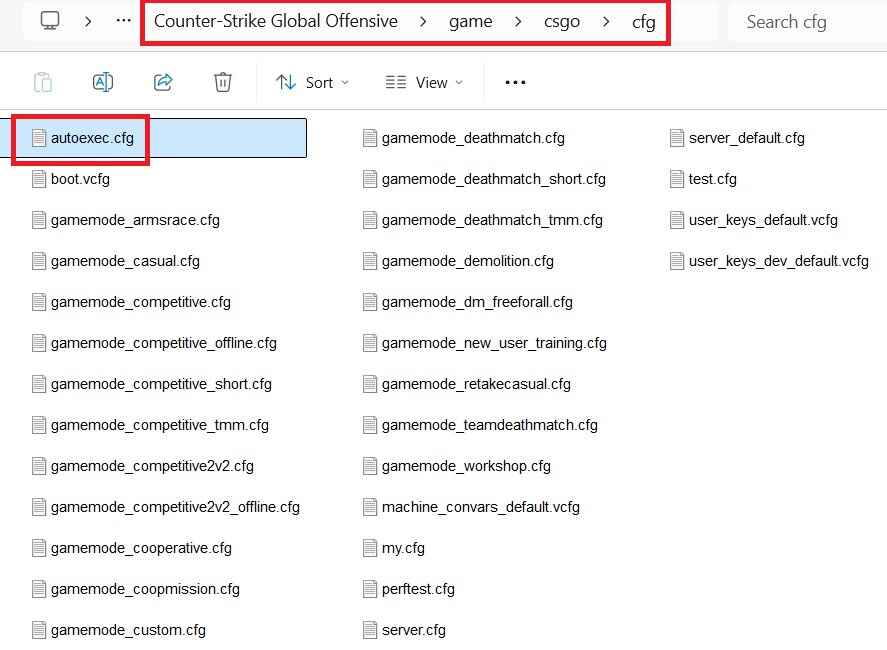
Method 3: Use the autoexec.cfg File (Auto)
In the same cfg folder, create a new file named autoexec.cfg.
The autoexec.cfg file is a legacy feature that works in all Counter-Strike games. It automatically runs every time CS2 starts, so it’s perfect for loading custom scripts, binds, and settings.
You can either:
Paste your scripts directly into autoexec.cfg, or use it to load other .cfg files like this:
exec my123.cfg
You can even organize your scripts into subfolders and load them with paths:
exec scripts/my123.cfg
Note: CS2 does not include an autoexec.cfg file by default, you must create it yourself.
For advanced setup tips, see these detailed guides:
Optimizing COUNTER-STRIKE 2 Player Configuration Files and Optimizing COUNTER-STRIKE 2 Server Configuration files.
Conclusion
This script shows how a deep understanding of Source 2’s input system and creative thinking can recreate powerful utilities – legally – even with Valve trying to shut the door.
Valve tried to block jump throws.
What they didn’t expect… was that I’d go through the ventilation shaft. (– Die Hard energy)